



Choose your air receiver hitch model
Select your hitch to jump to its installation instructions.
Set up your air receiver hitch
Follow the installation steps for your model, then adjust air pressure with your trailer loaded for travel. Use these shortcuts for setup help and maintenance.
Set air pressure for your loaded trailer
100 PSI MAXIMUM — not the target setting.
Use the truck-side bump cushion to judge the correct adjustment for your load. Never exceed 100 PSI.
- Load and connect your trailer. Follow your model’s installation steps and set up the trailer as you normally would for travel.
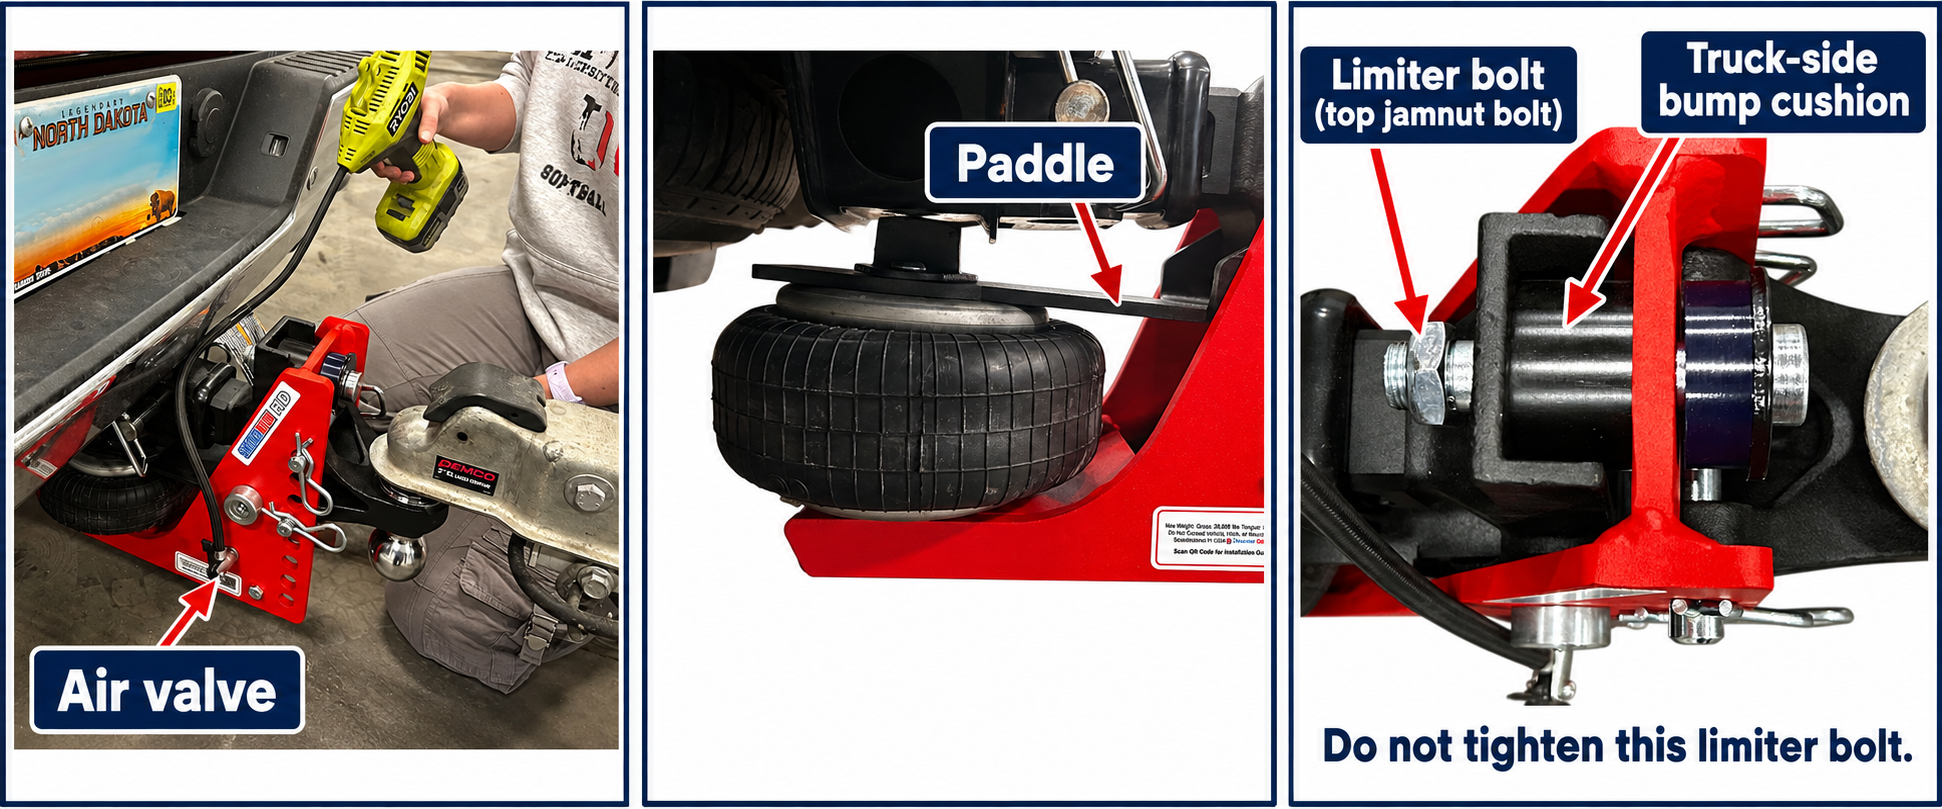
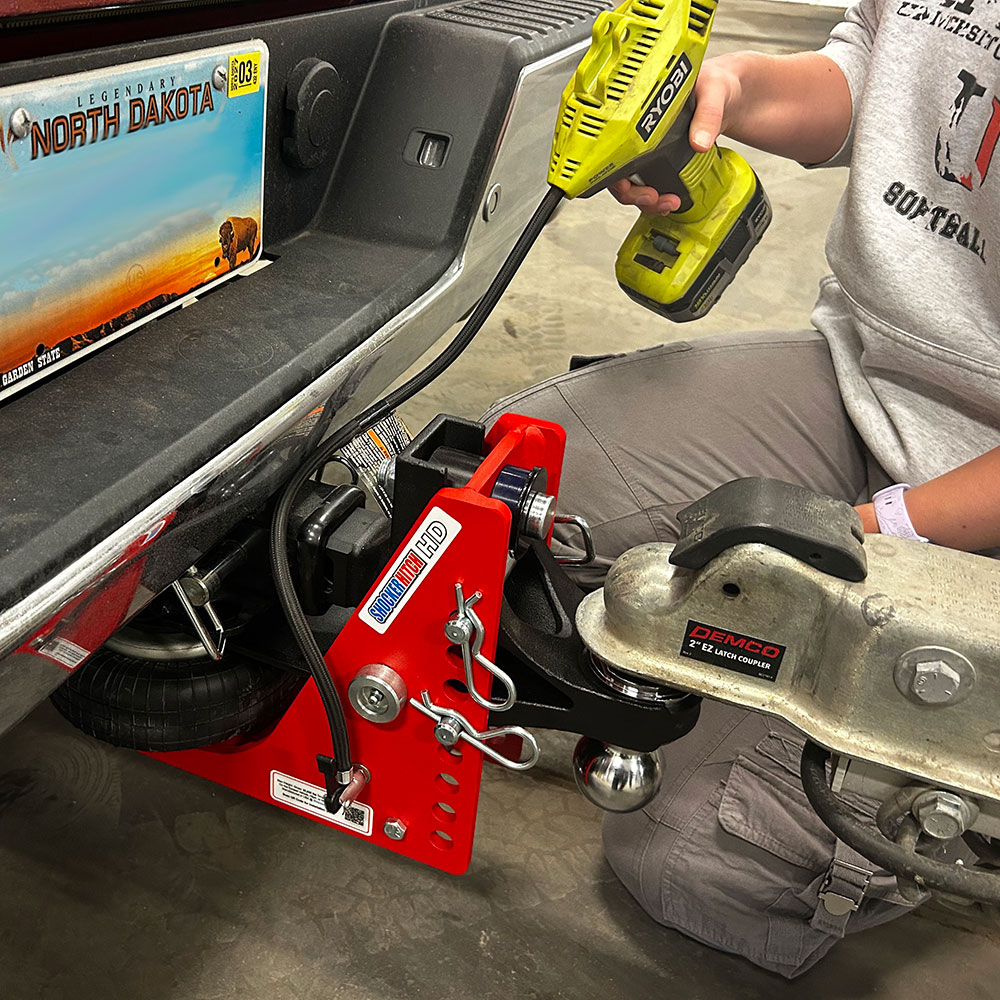
- Add air at your model’s valve. The photos below show where the air compressor connects.
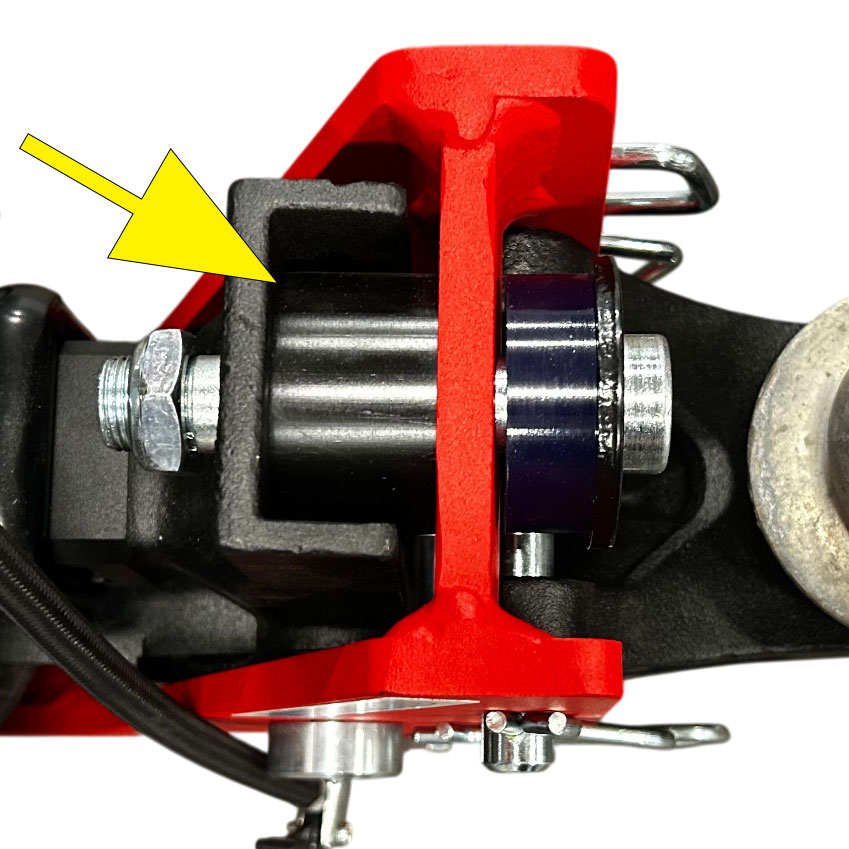
- Watch the truck-side bump cushion. Stop adding air once the main frame lightly compresses the cushion closest to the truck (tailgate side). Follow the detailed instructions for your model below.
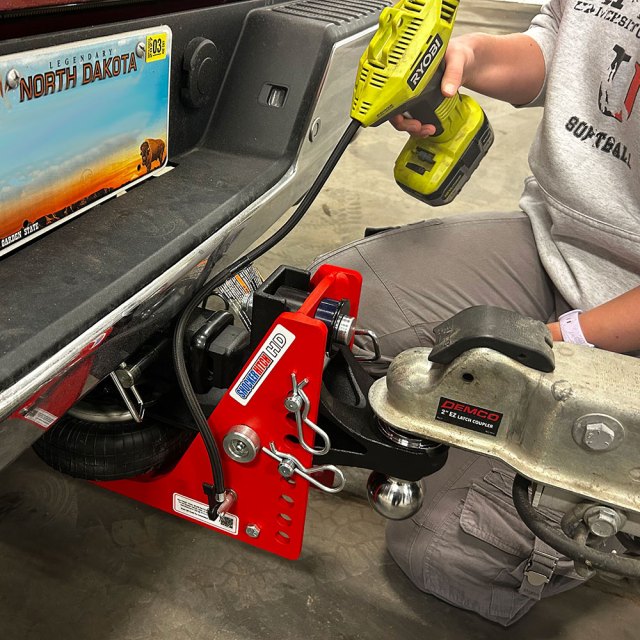
Add air at the valve shown where the compressor connects. Air-pressure steps
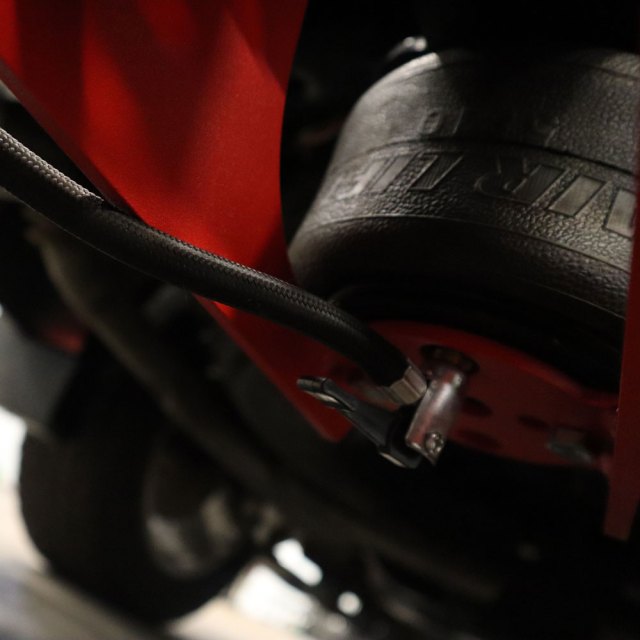
Locate the valve shown in this close-up. Air-pressure steps
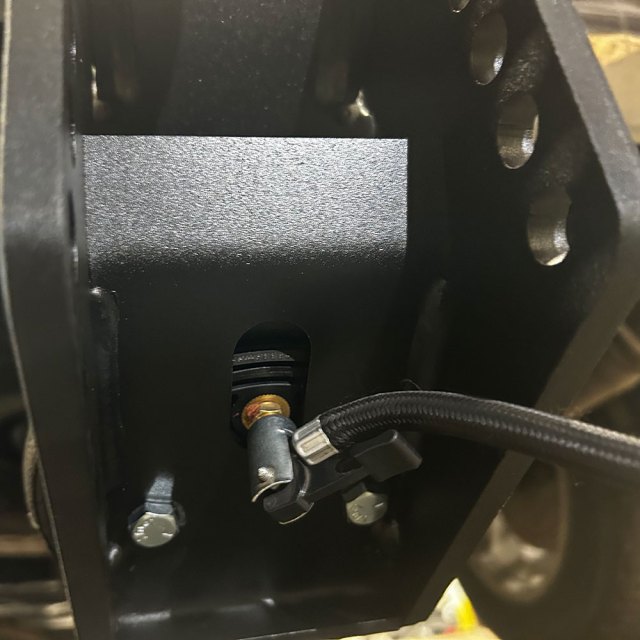
The air valve is below the air spring. Air-pressure steps
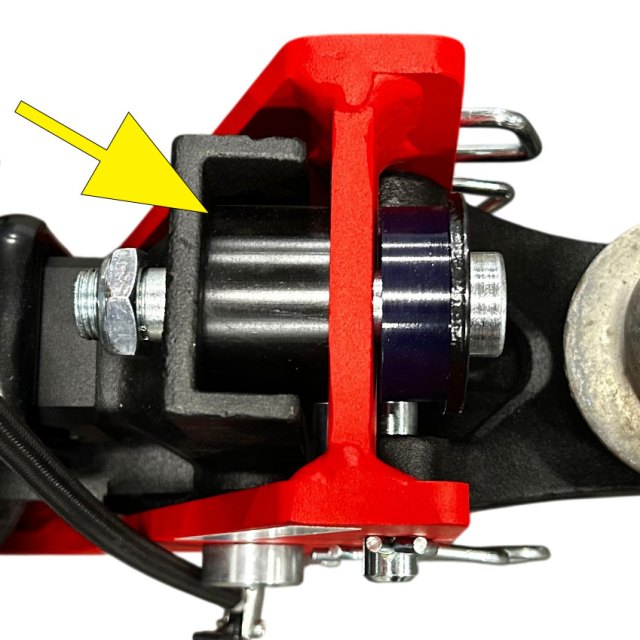
Watch this cushion—not a preset PSI number
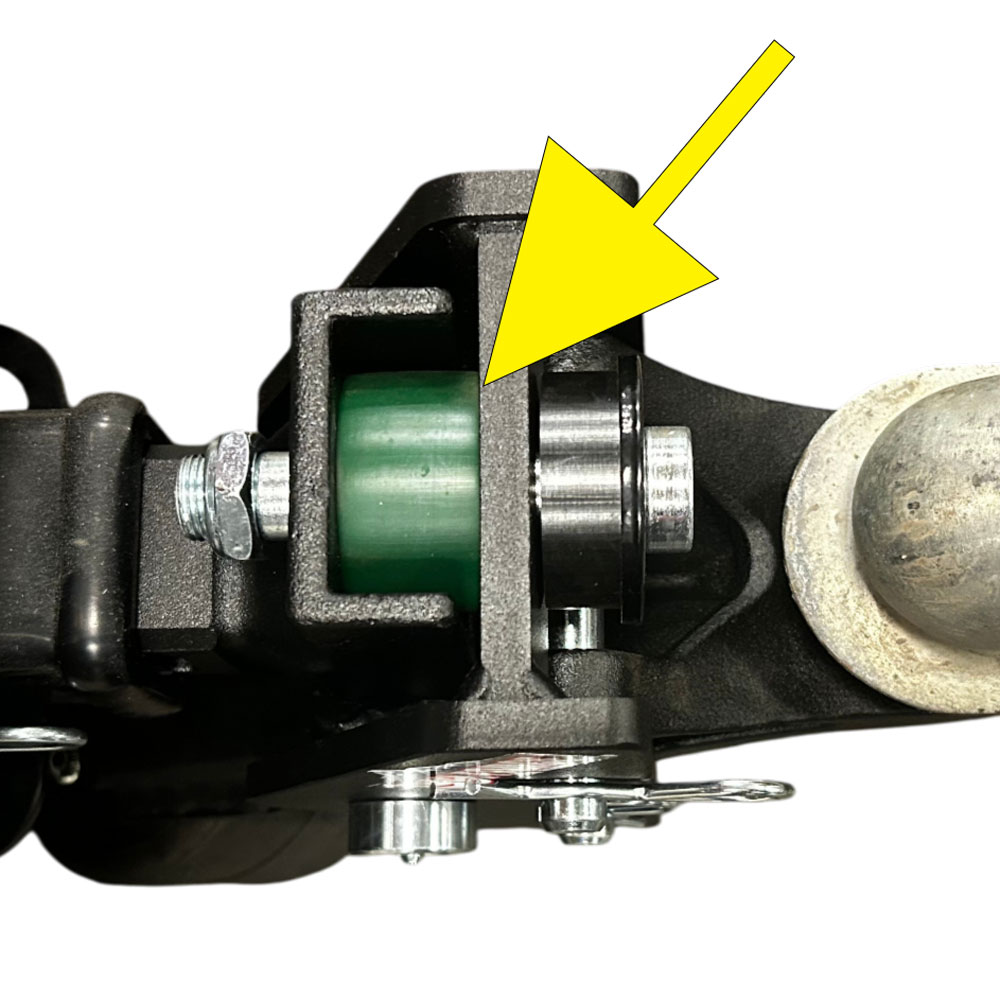
Observe the cushion closest to the truck. With the trailer loaded, add air until the main frame lightly compresses that cushion. The pressure needed depends on the load.
Recheck the adjustment when your trailer load changes. The 100 PSI limit is a ceiling, not an instruction to inflate to 100 PSI.
See the add-air / stop-adding-air photos ↓Know your air receiver hitch components
Select any photo to open the full-size labeled guide in a new tab.
Shocker Air Receiver Hitch Install Video
Note: Always use a good hitch ball rated for the recommended tow weight.
Safety Notice: Towing capacity is limited by the lowest rated component.
Shocker Air Receiver Hitch Installation Instructions
1. Compressing Air Spring (BEFORE INSTALLATION)
• Release Pressure: Use the provided cotter pin clip to push in on the valve core to release air pressure from the back.
• Compress: While releasing pressure, simultaneously push down on the air spring paddle or squeeze the plates together to exhaust the remaining air.
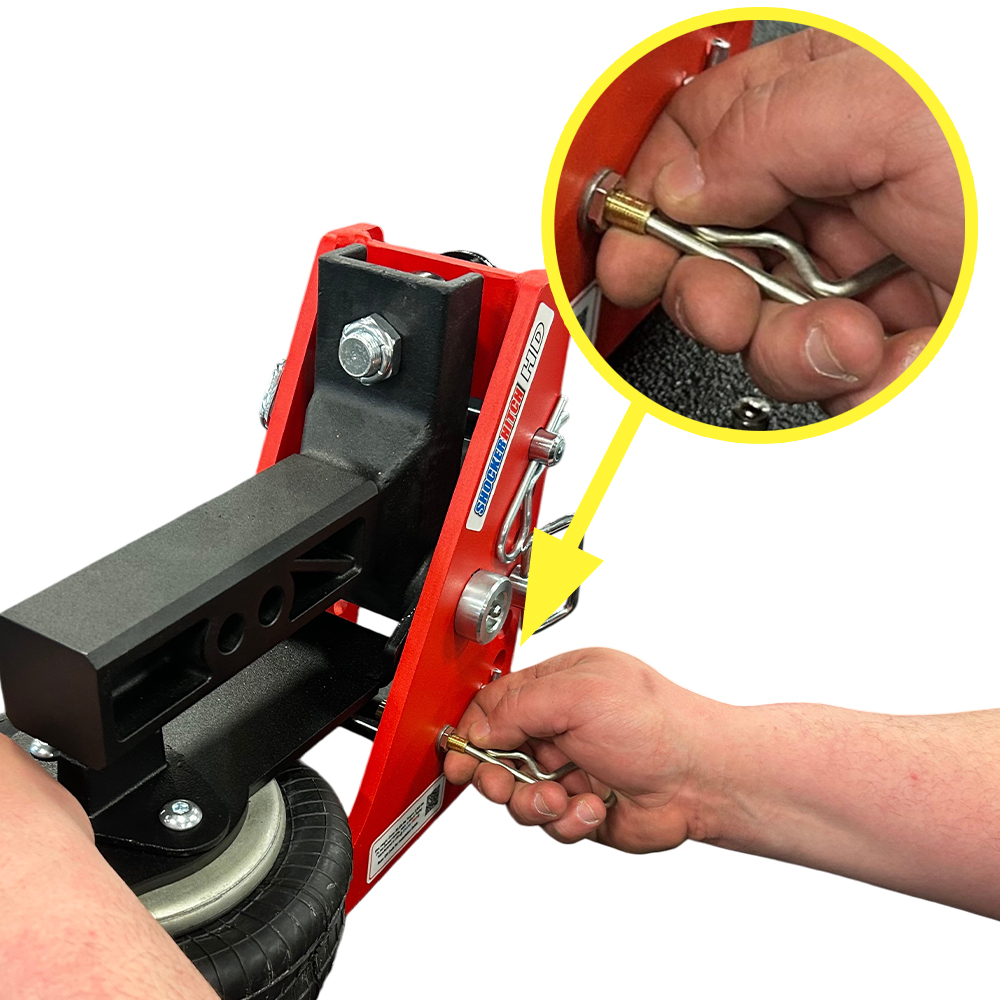
2. Installing the Shocker Hitch into the Receiver
• Mounting: Slide the hitch shank fully into the receiver tube of your tow vehicle.
• Align and Secure: Align the pin holes and insert the 5/8” hitch pin. Lock it in place with the cotter pin clip.
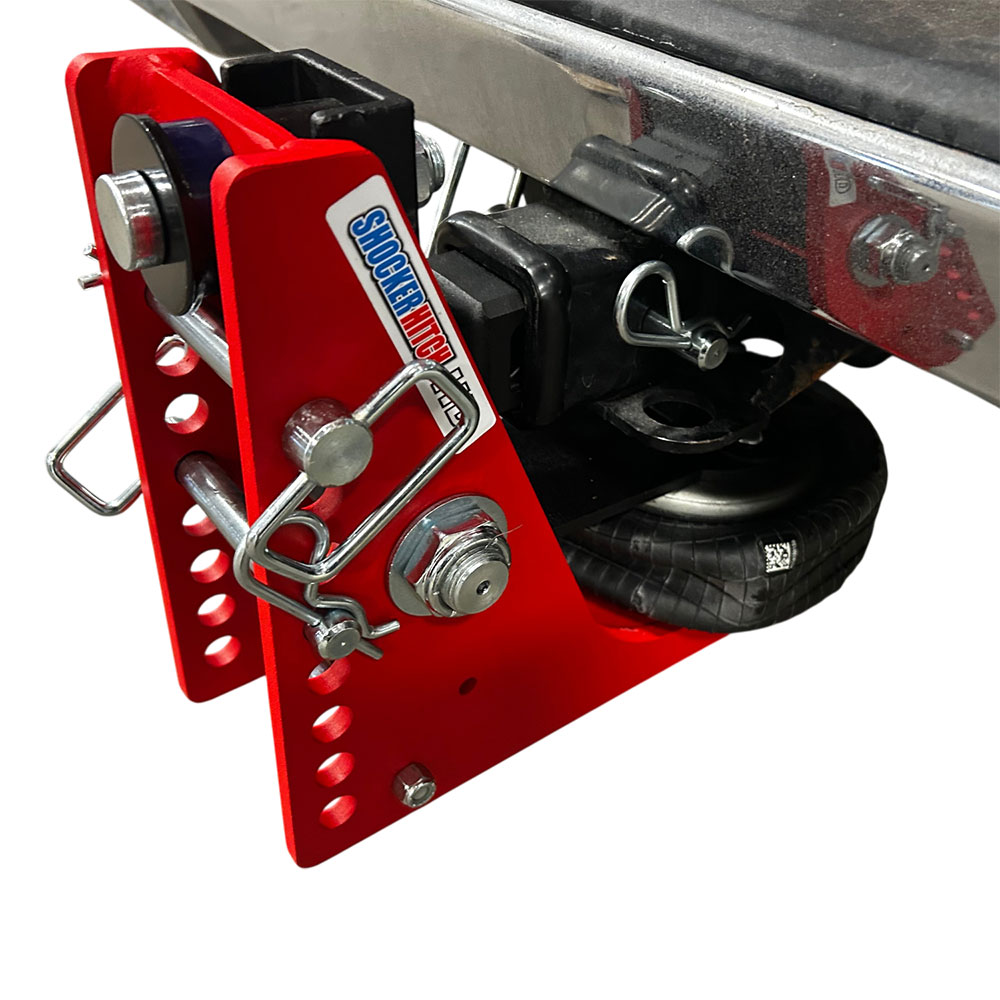
3. Install Attachment Ball Mount
• Selection: Choose an attachment that allows your trailer to sit level. Refer to “WHAT SIZE DROP HITCH DO I NEED” and “GROUND CLEARANCE GUIDE” for more information.
• Attachment: Install your chosen mount into the Shocker Hitch Frame.
• Secure: Use the hitch pins and cotter pin clips provided to lock the ball mount into place.
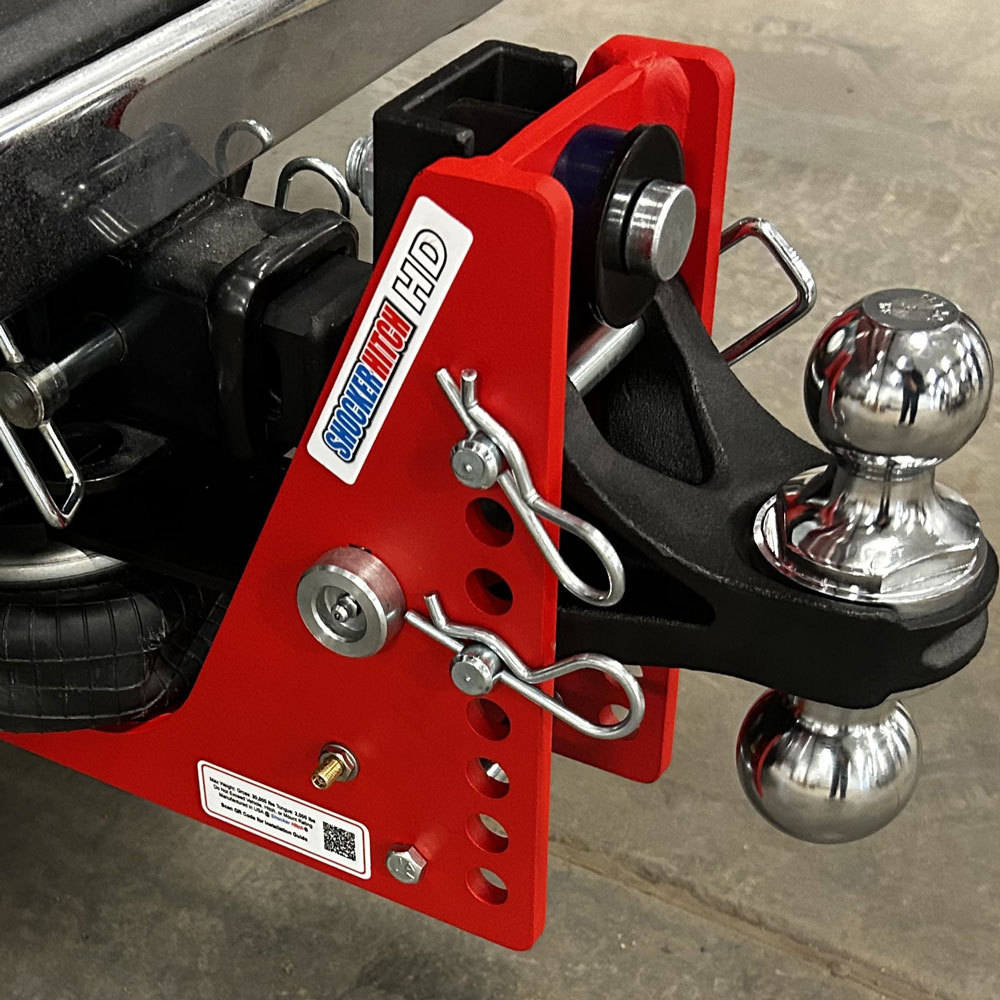
4. Setting Air Pressure
• Load the Trailer: Hook up your trailer and load it as you normally would for travel.
• To Set Air: Hook up trailer using a properly selected ball adaptor and height adjustment to level trailer when loaded. Next, inflate the air spring. As air pressure increases, the unit will rotate, lifting the hitch point. Install enough air until the top of the hitch frame touches the top (tailgate side) bump cushion, or for heavy loads, until it compresses the tailgate side bump cushion by approximately 1/8″.
The “Sweet Spot”
Stop adding air once the main frame lightly compresses the truck side bump cushion.
Proper Air Pressure Guide
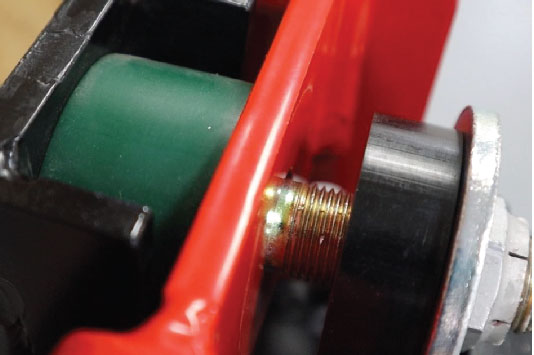
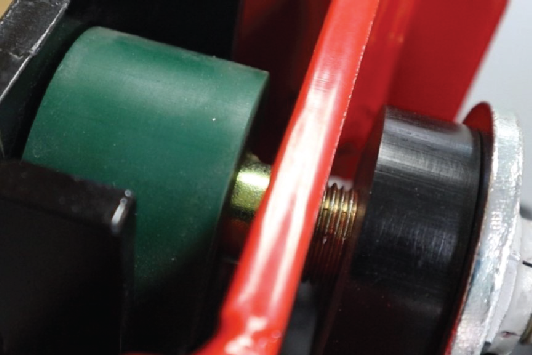
Spacer-block decision guide
Check alignment with your trailer connected, loaded for travel and the air pressure correctly set. The paddle above the air spring should be approximately parallel with the receiver tube.
When is a spacer block needed?
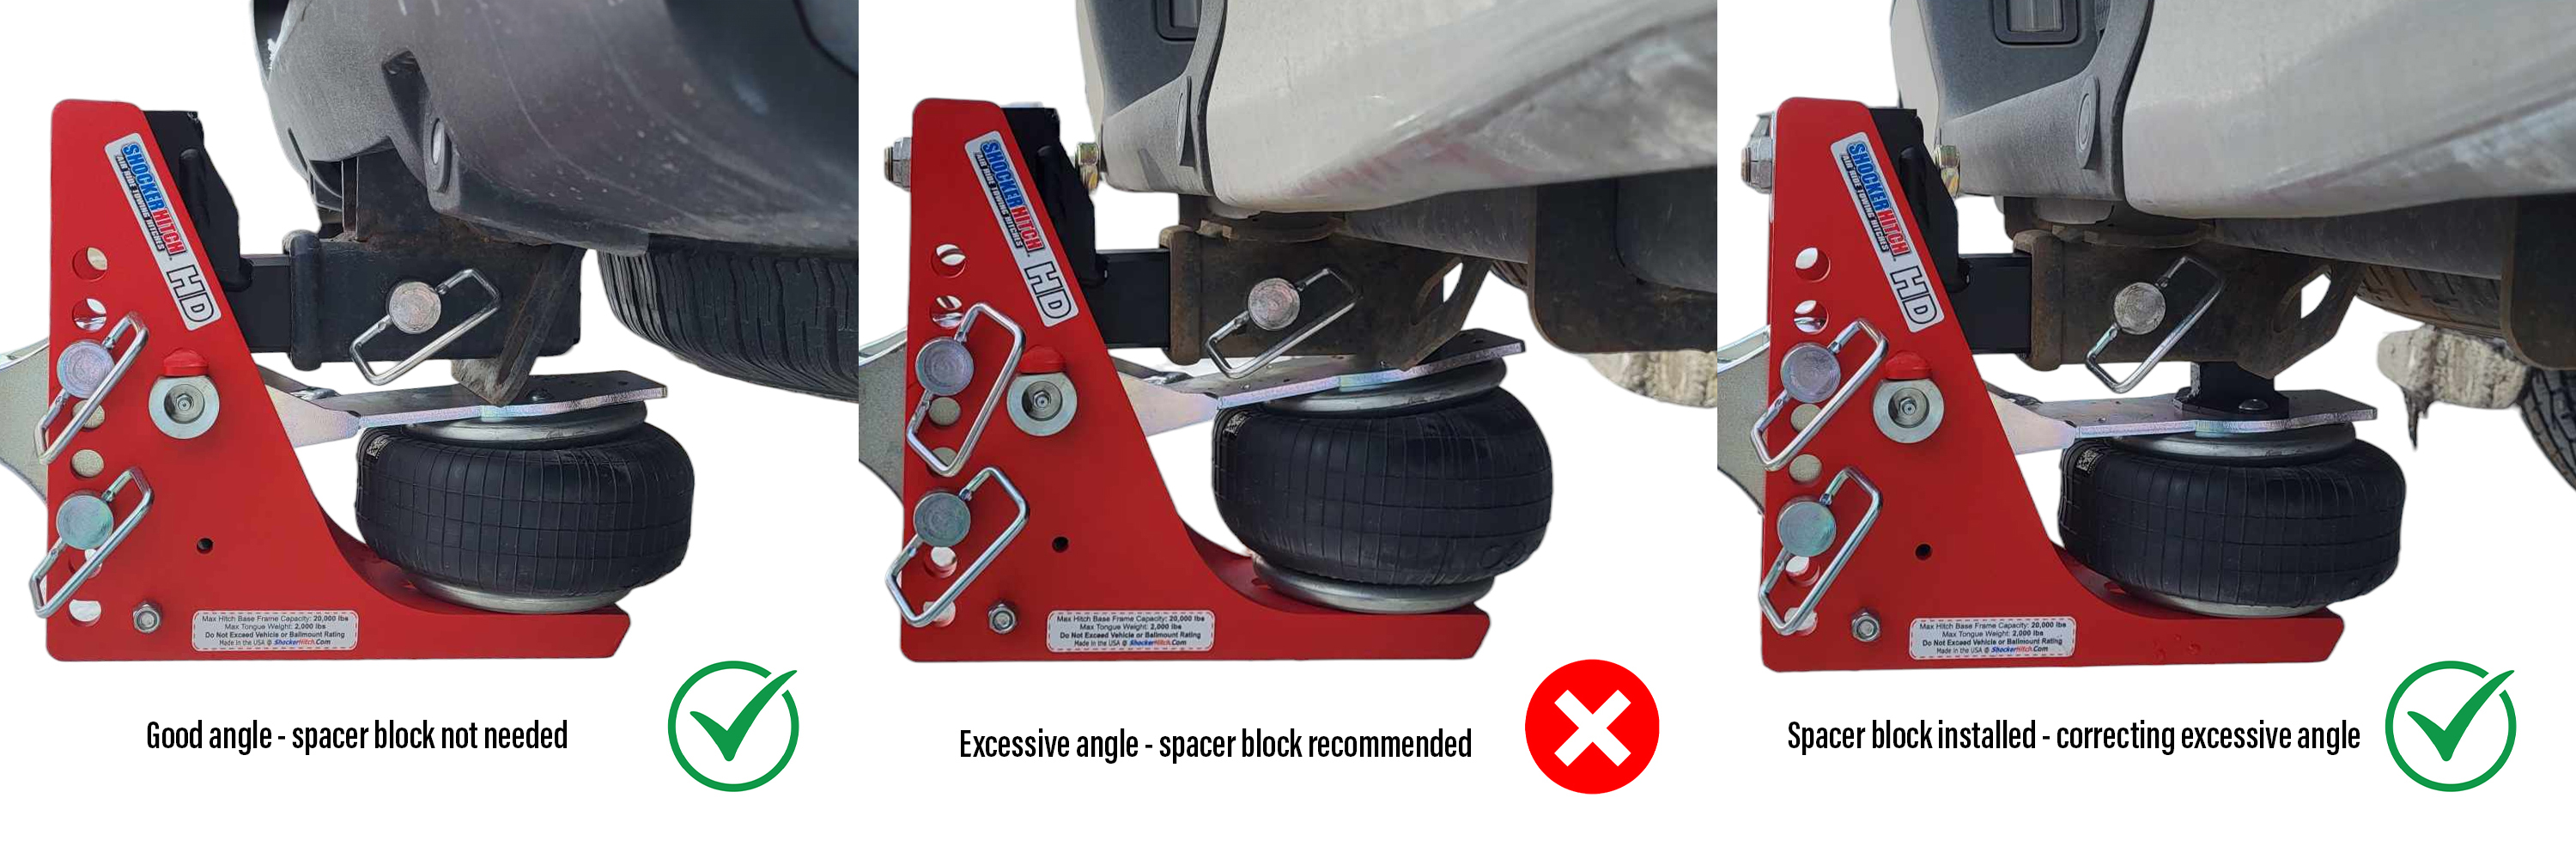
Paddle approximately parallel with the receiver tube. A spacer is not needed to correct the angle shown.
If the paddle angle is more than 10 degrees with pressure correctly set, follow the spacer-block guidance for your model.
The spacer sits on top of the paddle against the underside of the receiver tube, correcting the excessive angle.
Model notes: 20K HD hitches with a 2-inch receiver come with the spacer installed. Some HD models with a 2-1/2-inch receiver include it in the box. A spacer is generally not needed on 14K air receiver hitches because their air spring is 1 inch taller than the HD air spring.
Maximum air pressure: 100 PSI. Do not use extra air pressure to exceed this limit while checking alignment. Read the full spacer-block guide.
Watch: when do you need a spacer block?
Use this short video alongside the alignment photos above to understand the spacer-block setup.
Additional Set Up Notes:
- When towing heavy trailers or trailers with high wind resistance, it may be necessary to increase air pressure in the Shocker.
- It is highly recommended that the hitch ball be greased to reduce wear and improve shocker action.
- Ensure you have connected your safety chains and electrical cord before towing.
- DO NOT TIGHTEN THE TOP BOLT, IT IS A LIMITER STOP ONLY.
Maximum Air Pressure: Do not exceed 100 psi in the air spring, as it may damage the air spring.
Will the Shocker Air Bumper Hitch work with Equalizer or Weight-Distribution? If you have an equalizer or weight distribution hitch, then it will not. However, check out our Shocker Air Equalizer for weight distribution hitches. If you are just using friction sway bars that hook to a mini ball (such as the shocker sway control arm bar kit), then yes, if you also have one of our sway bar tab mounts, such as the combo sway control ball mount attachment.
Sport Air Receiver Hitch Installation Instructions
1. Compressing Air Spring (BEFORE INSTALLATION)
• Release Pressure: Use the provided cotter pin clip to push in on the valve core to release air pressure from the back.
• Compress: While releasing pressure, simultaneously push down on the air spring paddle or squeeze the plates together to exhaust the remaining air.
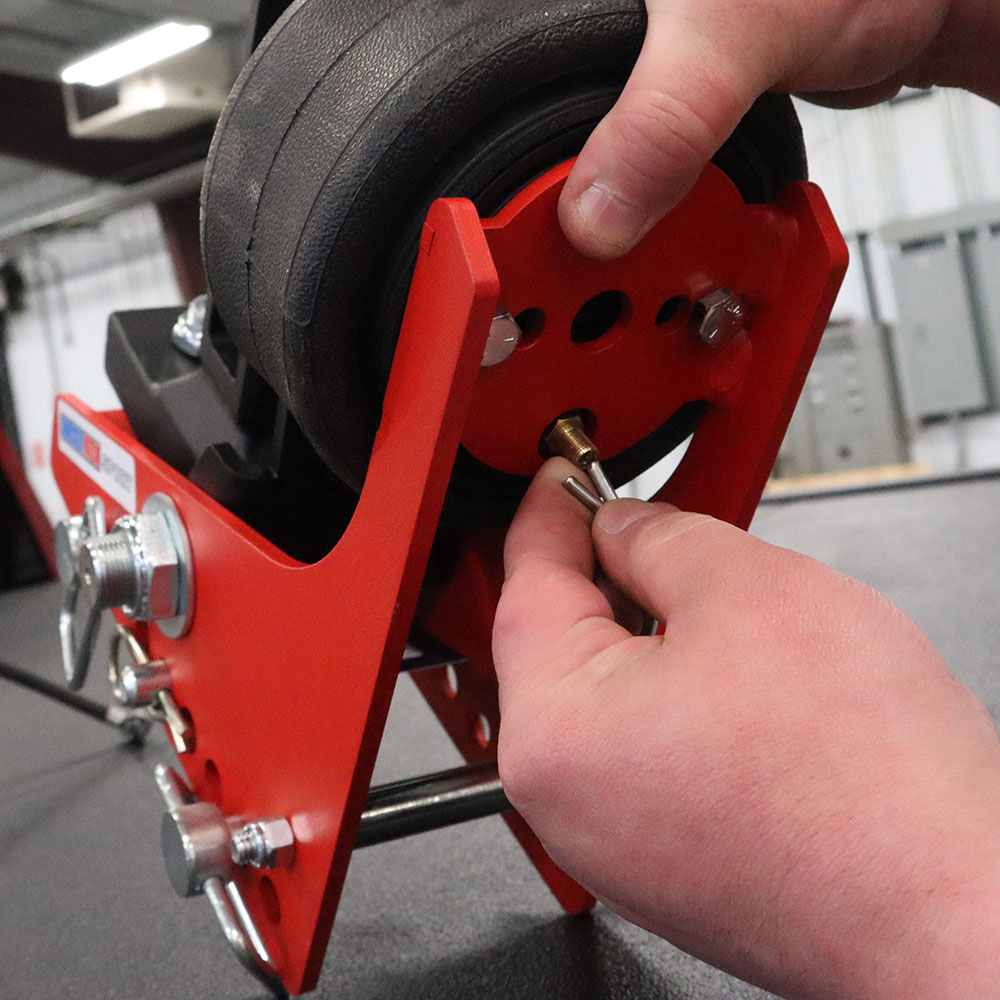
2. Installing the Shocker Sport Hitch into the Receiver
• Mounting: Slide the hitch shank fully into the receiver tube of your tow vehicle.
• Align and Secure: Align the pin holes and insert the 5/8” hitch pin. Lock it in place with the cotter pin clip.
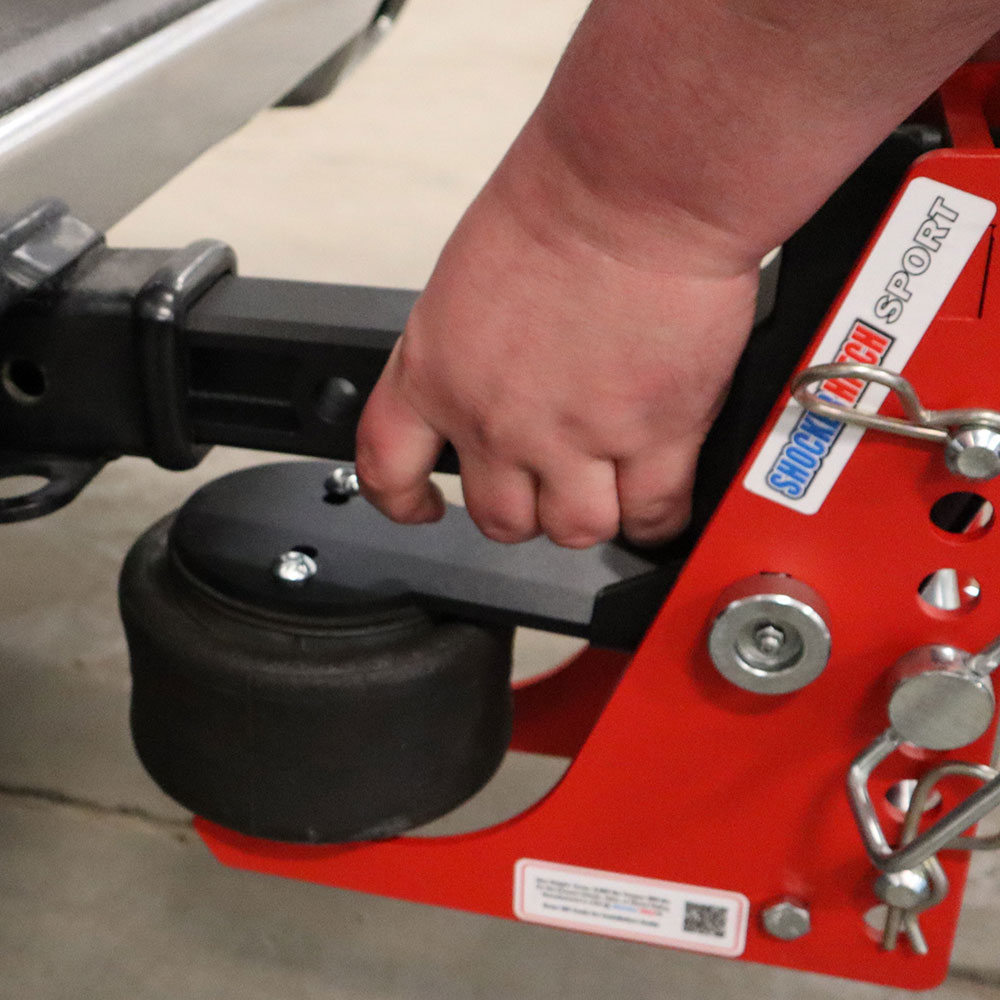
3. Install Attachment Ball Mount
• Selection: Choose an attachment that allows your trailer to sit level. Refer to “WHAT SIZE DROP HITCH DO I NEED” and “GROUND CLEARANCE GUIDE” for more information.
• Attachment: Install your chosen mount into the Shocker Sport Hitch Frame.
• Secure: Use the hitch pins and cotter pin clips provided to lock the ball mount into place.
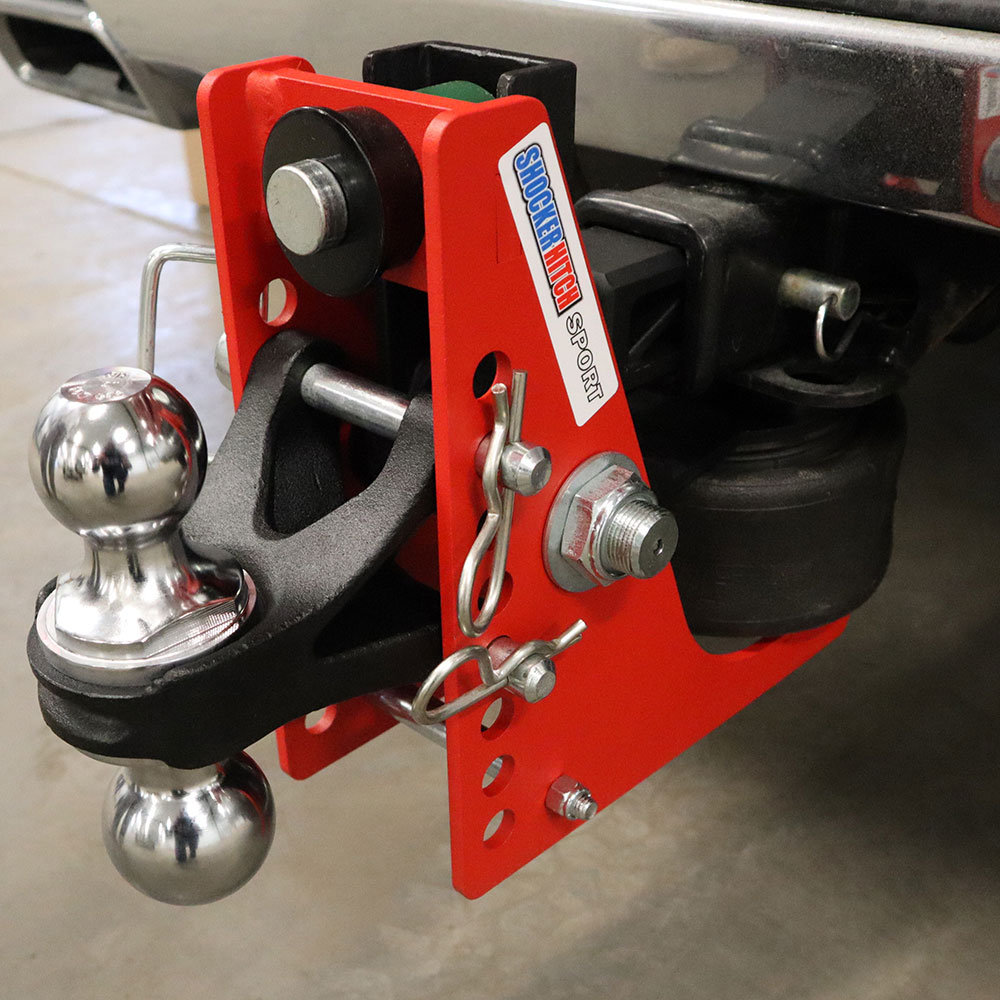
4. Setting Air Pressure
• Load the Trailer: Hook up your trailer and load it as you normally would for travel.
• To Set Air: Hook up trailer using a properly selected ball adaptor and height adjustment to level trailer when loaded. Next, inflate the air spring. As air pressure increases, the unit will rotate, lifting the hitch point. Install enough air until the top of the hitch frame touches the top (tailgate side) bump cushion, or for heavy loads, until it compresses the tailgate side bump cushion by approximately 1/8″.
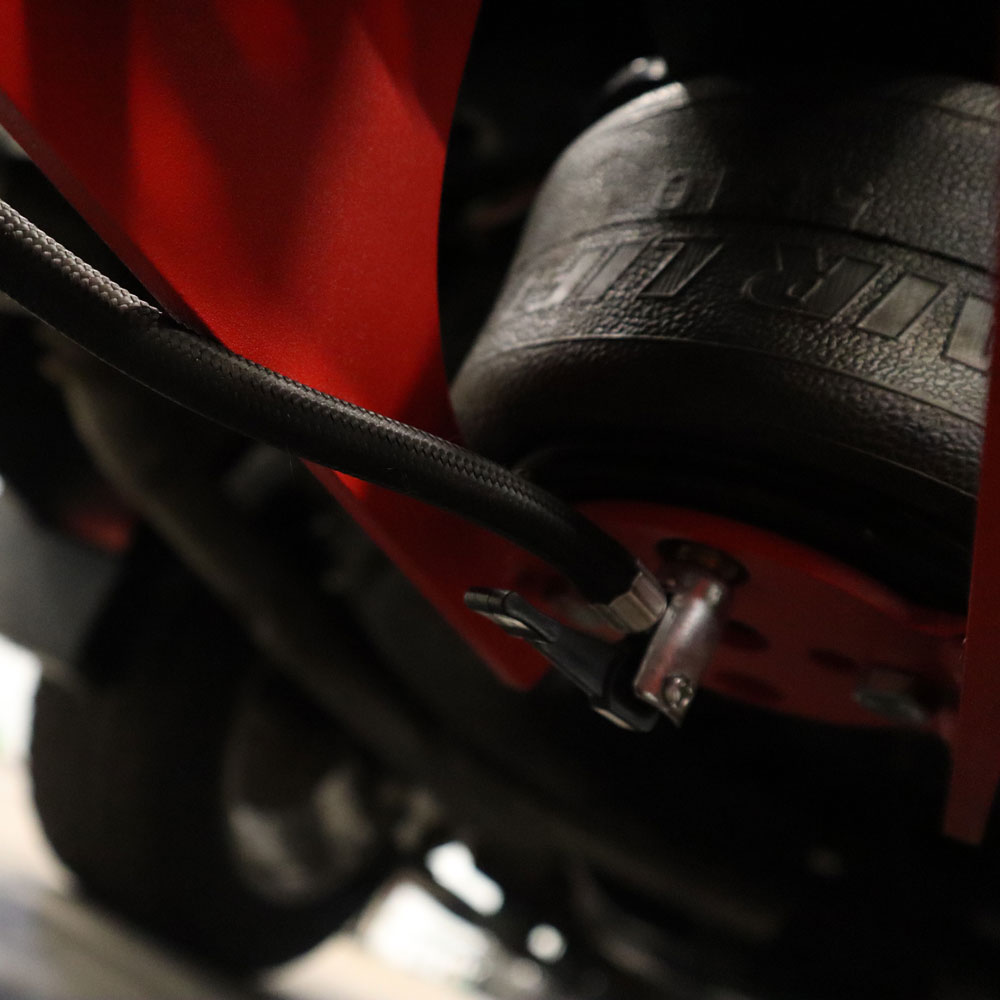
The “Sweet Spot”
Stop adding air once the main frame lightly compresses the truck side bump cushion.
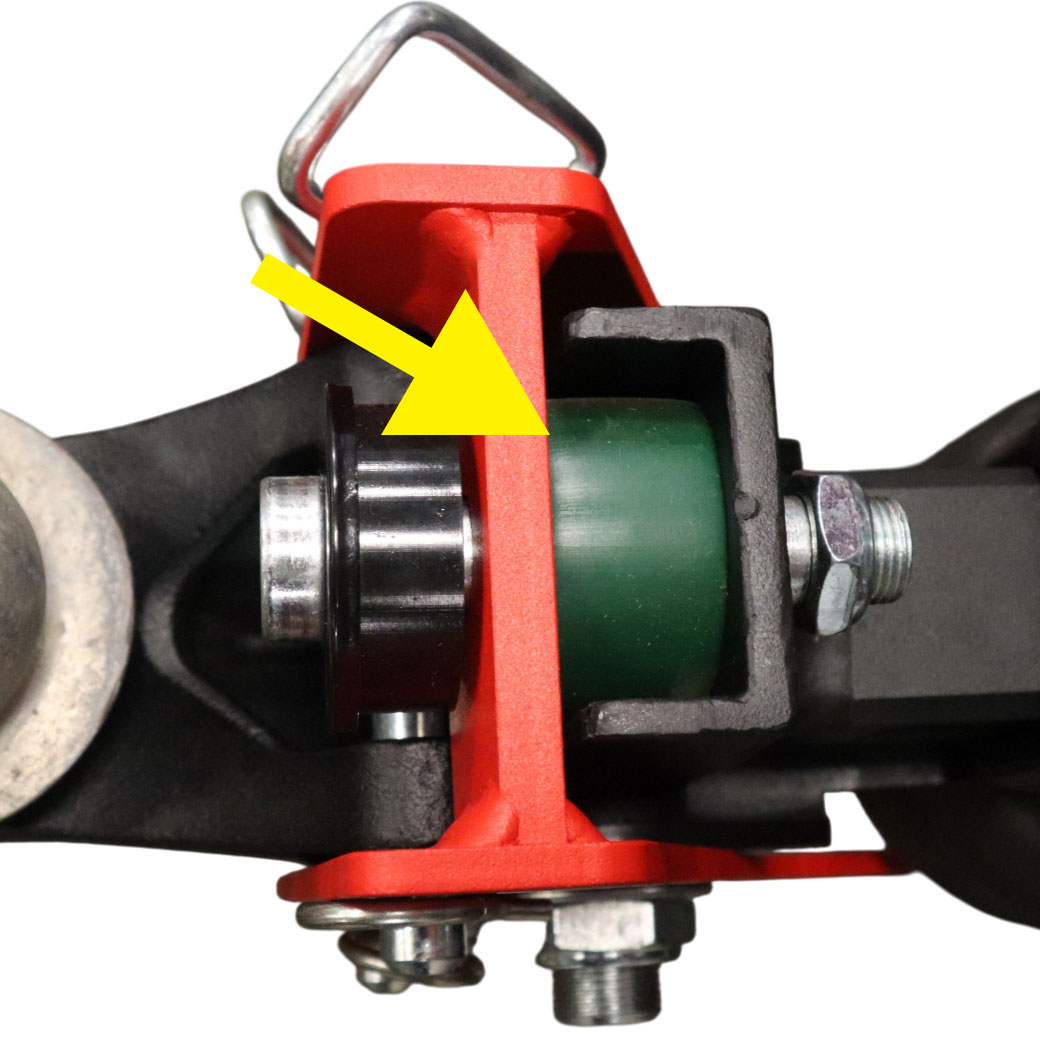
Trail Force Receiver Hitch Installation Instructions
1. Installing the Trail Force Air Hitch into the Receiver
• Mounting: Slide the hitch shank fully into the receiver tube of your tow vehicle.
• Align and Secure: Align the pin holes and insert the 5/8” hitch pin. Lock it in place with the cotter pin clip.
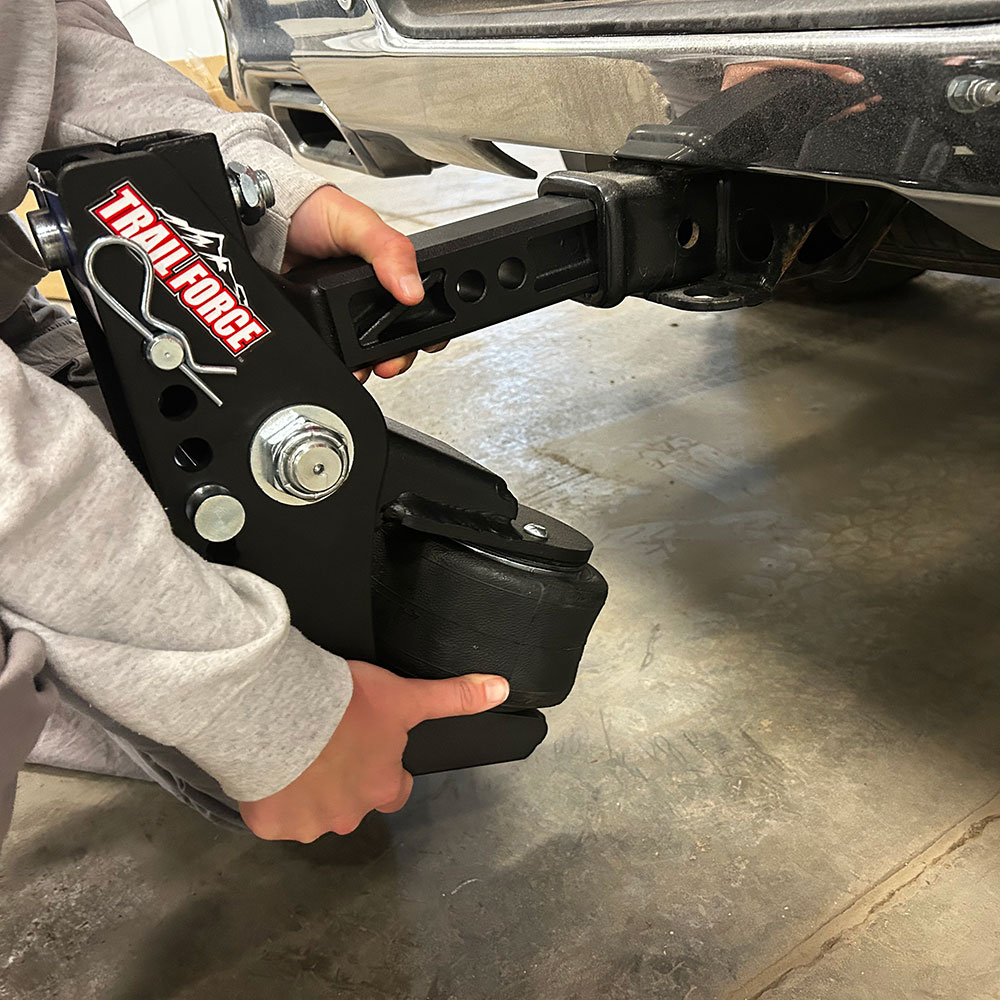
2. Install Attachment Ball Mount
• Selection: Choose an attachment that allows your trailer to sit level. Refer to “WHAT SIZE DROP HITCH DO I NEED” and “GROUND CLEARANCE GUIDE” for more information.
• Attachment: Install your chosen mount into the Trail Force Hitch Frame.
• Secure: Use the hitch pins and cotter pin clips provided to lock the ball mount into place.
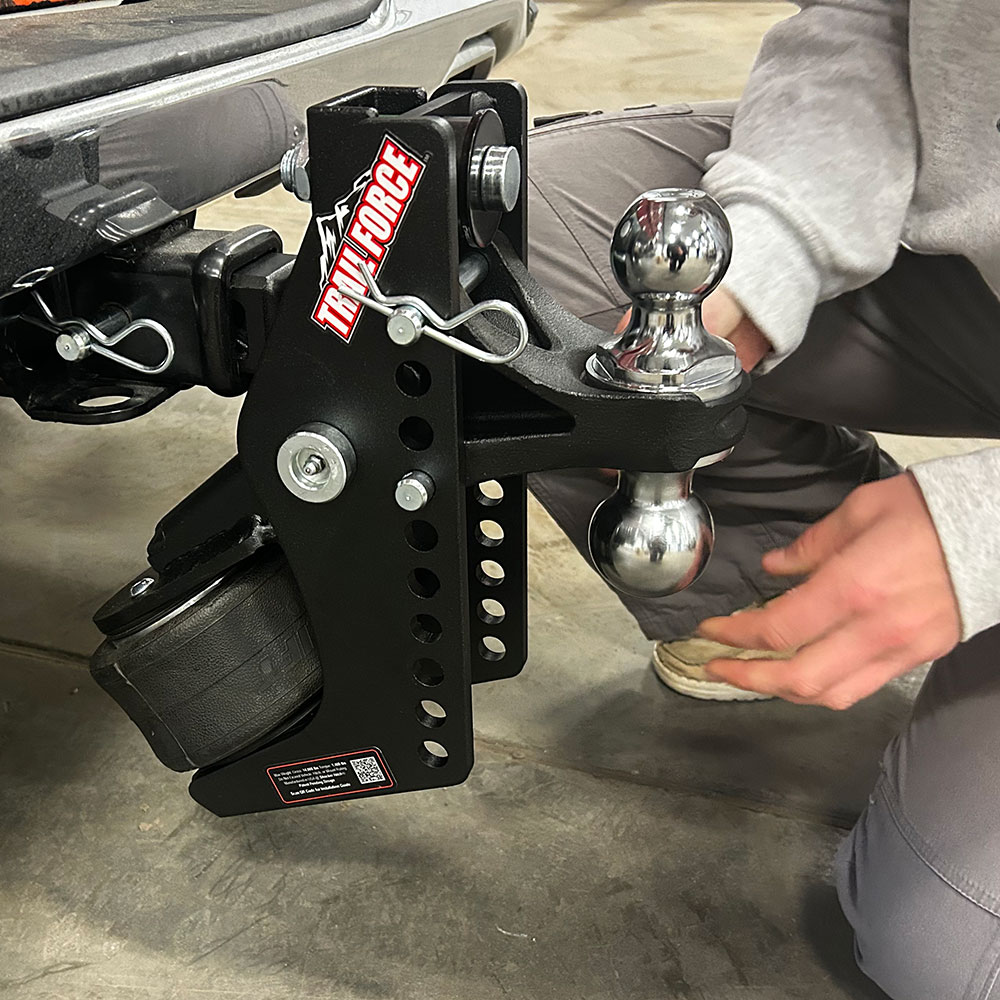
3. Setting Air Pressure
• Load the Trailer: Hook up your trailer and load it as you normally would for travel.
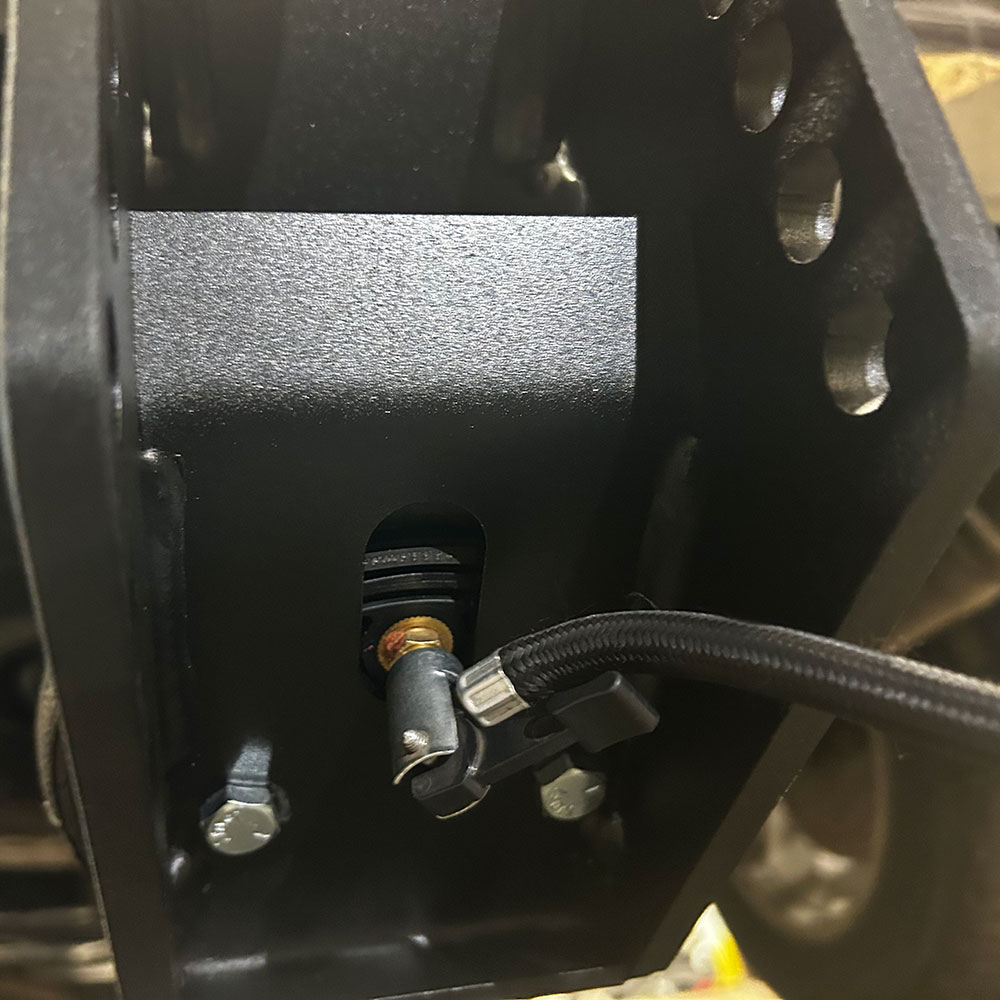
• To Set Air: Hook up trailer using a properly selected ball adaptor and height adjustment to level trailer when loaded. Next, inflate the air spring. As air pressure increases, the unit will rotate, lifting the hitch point. Install enough air until the top of the hitch frame touches the top (tailgate side) bump cushion, or for heavy loads, until it compresses the tailgate side bump cushion by approximately 1/8″.
The “Sweet Spot”
Stop adding air once the main frame lightly compresses the truck side bump cushion.
Download Shocker Air Receiver Hitch Install Instructions
Download: Shocker Air Bumper Hitch Installation Manual
Shocker Air Receiver Hitch Air Pressure PSI Tuning Video
Air receiver hitch troubleshooting
Start with your trailer connected and loaded for travel. Follow the instructions for your model above; do not use extra air pressure or bolt adjustments to compensate for an incorrect setup.
The ride feels stiff
Recheck the air setting against the truck-side bump cushion rather than aiming for a preset PSI. The main frame should lightly compress that cushion. Check routine lubrication, too.
Do not tighten the top jamnut bolt (limiter bolt). If it has already been adjusted, contact our team before making further adjustments.
See the labeled bolt and cushion · Maintenance stepsThe hitch seems to be losing air
A changed trailer load, temperature change or a new air spring settling can affect pressure. Recheck the loaded setup. Persistent or substantial pressure loss needs a leak check; use the air receiver section of our detailed guide.
Never inflate an air spring outside its hitch frame. If the spring will not hold air or appears damaged, contact our team before towing.
Air-pressure loss troubleshootingThe paddle angle looks excessive
With air pressure correctly set, compare your setup with the three alignment examples. The paddle above the air spring should be approximately parallel with the receiver tube. Spacer requirements depend on the model and receiver size.
Never exceed 100 PSI to try to correct alignment.
Check the spacer-block decision guideRoutine Maintenance Guide:
- Routine Lubrication
• Pivot Bolt: Regularly grease the Shocker Hitch unit using the built-in grease zerk located on the main pivot bolt.
• Over-Greasing: You cannot over-grease the unit; frequent lubrication ensures the air-ride pivot remains fluid and responsive.
• Hitch Ball: It is highly recommended to grease the trailer coupler ball to reduce friction and prevent premature wear. - Critical Adjustments
• Top Jamnut Bolt: DO NOT tighten the top jamnut bolt.
• Factory Specs: This bolt is set to factory specifications out of the box; overtightening will cause a stiff towing experience and limit the airbag’s effectiveness.
• Attachment Swapping: When changing between different ball mounts (Combo, Pintle, Clevis, etc.), ensure the pins and cotter pin clips are fully seated and locked. - Air System Integrity
• Max Pressure: Never Exceed 100PSI in the air spring.
• Component Protection: Excessive pressure can lead to permanent damage to the air spring or the internal bump cushions.
• Pre-Tow Inspection: Always check your air pressure after loading the trailer to ensure the frame is lightly compressing the bump cushion.
Common Replacement Part:
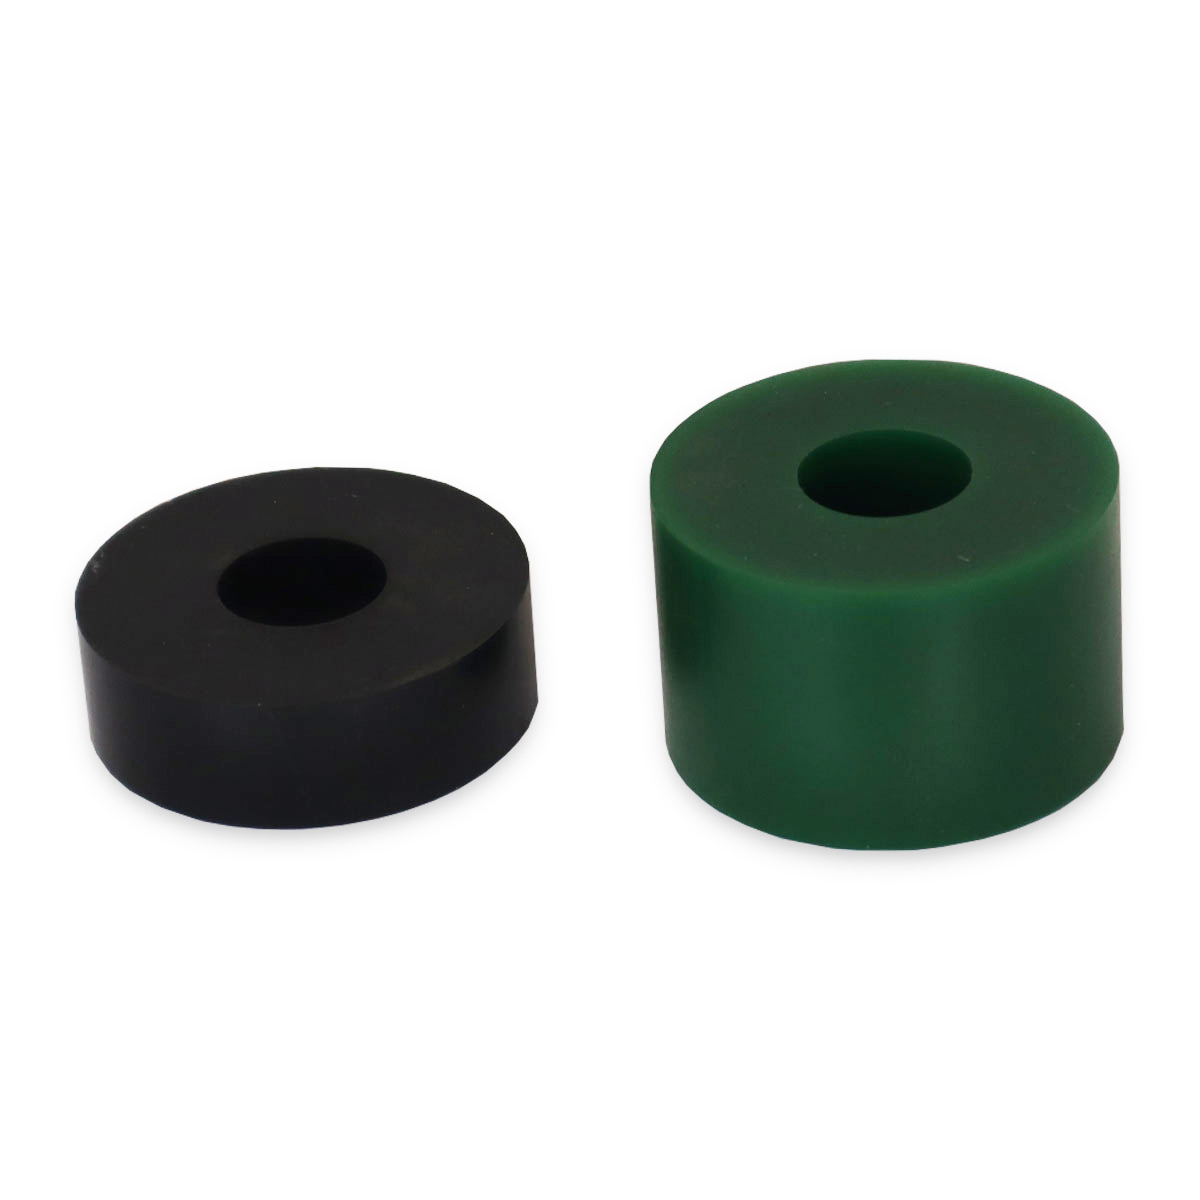
Bump Cushion
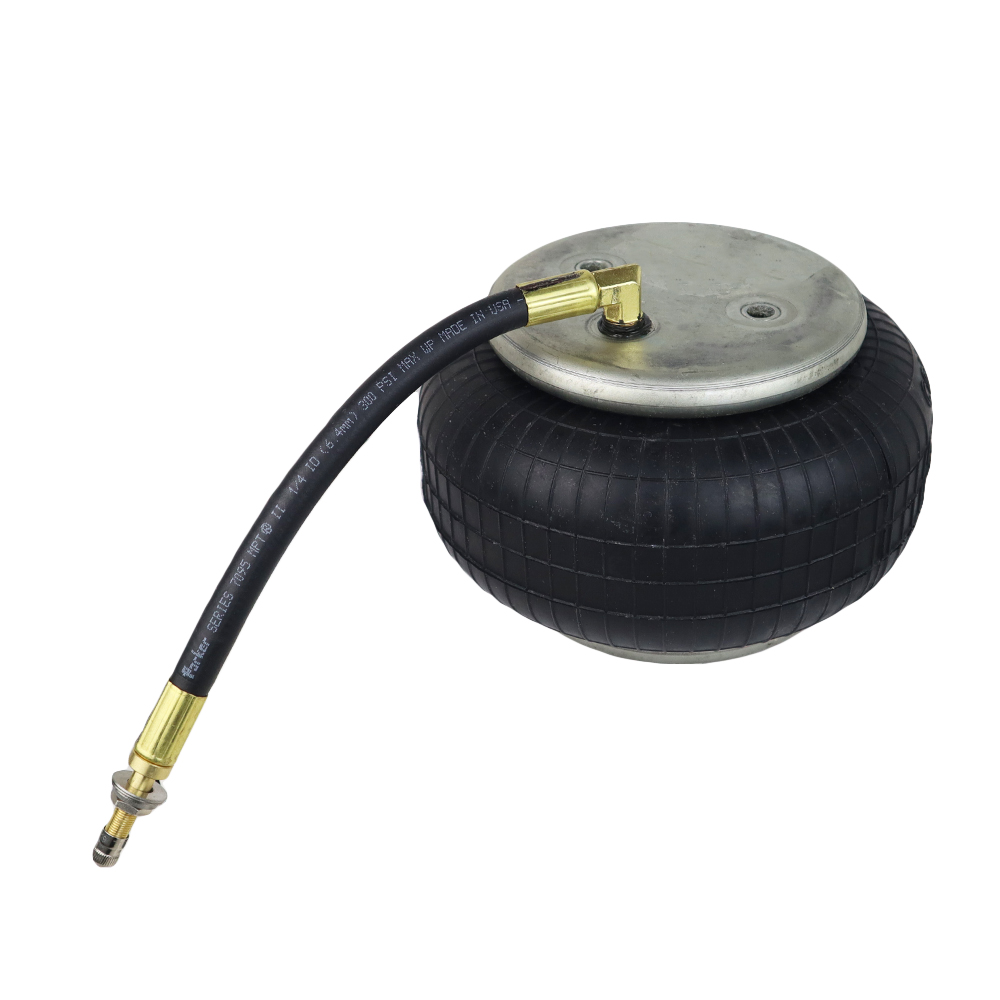
Air Spring Bag
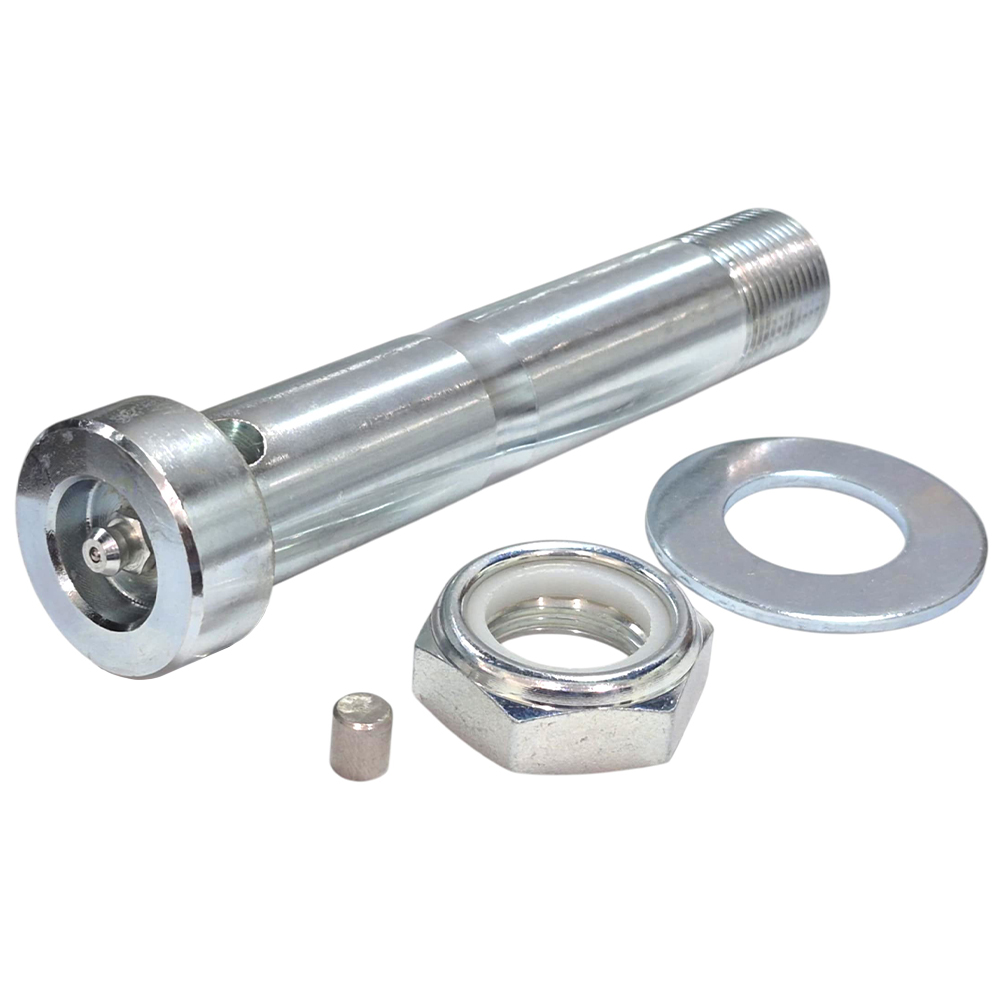
Pivot Bolt Kit
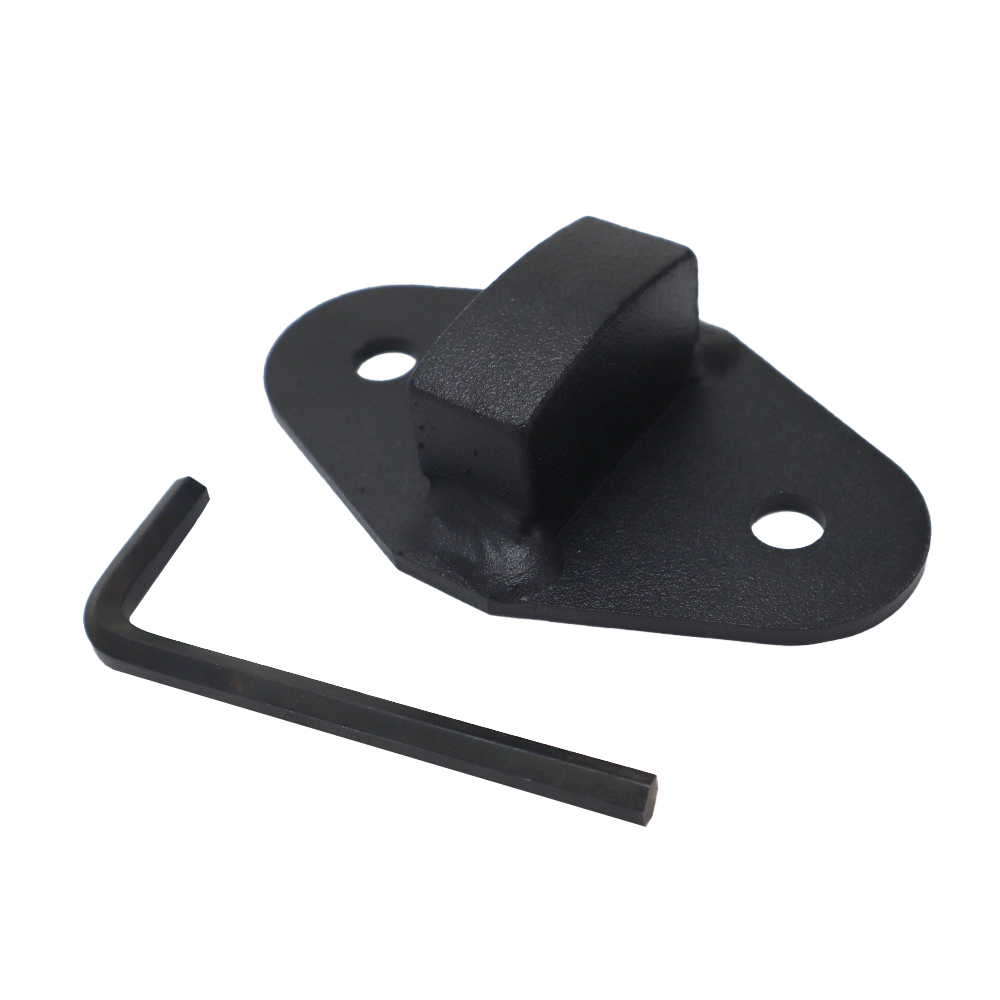
Spacer Block Kit
Air receiver hitch installation FAQs
Quick answers for standard and HD air receivers, Sport™ and Trail Force® models.
How much air pressure should I use?
There is no single PSI setting for every trailer. With the trailer connected and loaded, add air until the main frame lightly compresses the truck-side bump cushion, following your model’s steps. Recheck after changing the load. 100 PSI is the maximum, not the target.
See the air-pressure photos and stepsWhich valve and bump cushion should I look at?
Use the air valve shown for your model. Watch the cushion nearest the truck, also called the tailgate-side cushion. The paddle is the flat steel plate above the air spring; the limiter bolt is not an air-pressure adjustment.
View the labeled component photosDo I need a spacer block?
Check the paddle angle with the trailer loaded and air pressure set. An angle greater than 10 degrees calls for reviewing the spacer guidance for your model. The 20K HD with a 2-inch receiver comes with the spacer installed; some HD 2-1/2-inch models include it in the box. A spacer is generally not needed on 14K air receivers.
Read the full spacer-block guideHow do I choose the receiver size and ball-mount height?
Measure the inside opening of your vehicle’s receiver and match the hitch shank to it. Select a ball mount with enough drop or rise to keep the loaded trailer level, then check ground clearance.
Measure receiver size · Drop hitch calculator · Ground-clearance guideCan I use a weight-distribution hitch or friction sway control?
The air receiver hitches covered here are not for use with a weight-distribution system. See the Shocker Air Equalizer for that application and confirm compatibility with your setup. Friction sway control requires the appropriate sway-bar-tab ball mount and compatible sway-control components; it is a different setup from weight distribution.
Sway-control guide · Ask about compatibilityDoes adding air increase my towing capacity?
No. Stay within the vehicle, receiver, hitch, ball mount, ball, coupler and trailer ratings. The lowest-rated component limits the setup, including its applicable tongue-weight limit.
Understand towing capacityWhat should I check before the first tow?
Check that the receiver pin, attachment pins and their retaining clips are fully secured; the coupler is locked on the correct ball; and the safety chains and electrical connection are in place. Confirm loaded trailer height, ground clearance and air adjustment, then complete the full pre-tow checks.
Open the towing checklistHow do I choose a replacement air spring or cushion?
Match the part to your exact hitch model and air-valve or air-line configuration. Do not select by appearance alone. Use the replacement-part links on this page, or send our team your model number and a photo before ordering.
View replacement parts · Get setup help