



Shocker Hitch repair guide
Choose the instructions for your air-line system, follow the illustrated replacement steps, then check for leaks and reset air pressure with your trailer loaded.
Before you start
Identify your hitch model and match the replacement parts to it. Unhook the trailer and support the hitch securely before disassembly. For an air hitch, release all air pressure before removing the air bag, air line or hardware.
These procedures cover receiver hitches with an external air line. Match the fittings on your hitch to the pictures below; if the system has been updated, its fittings may differ from the original model year. Sport™ and Trail Force models with a valve directly on the air bag do not use these air-line instructions.
Choose your system · 1 of 2
2023 & newer: premium air line
Remove the air bag bolts
Start by removing the top air bag bolts located on the top side of the paddle with a 7/32” Allen wrench, if applicable, also remove the paddle spacer block. Continue by removing the bottom air bag bolts using an impact wrench with a 9/16“ socket. Set all hardware aside for later installation.
Release the air valve
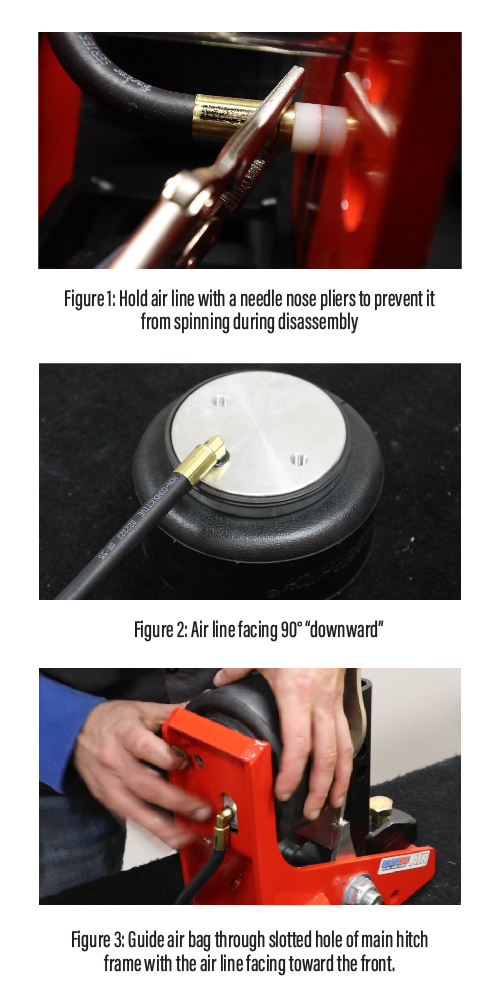
Using a ratchet wrench with a 1/2” socket, loosen the nut holding in the air valve and remove it from the main hitch frame. In some cases, the air line may need to be held using a needle nose pliers due to the nut being too tight which can cause the air line to spin while attempting to loosen (see Figure 1).
Disconnect the old air line
If you are replacing just the air bag and/or the air line, remove the existing air line from the original air bag using a 10mm wrench for 12K models or 1/2” for 20K models.
Seal and attach the air line
Add a generous amount of non-hardening sealant to the threads of the new/existing premium air line and finger tighten onto the new/existing air bag. Finish tightening with a 10mm wrench for 12K models or 1/2” for 20K models with the air line facing 90° “downward” (see Figure 2).
Position the air bag
Take the new, or assembled, air bag with the premium air line and guide in through the slotted hole on the main hitch frame with the air line facing the front of the hitch (see Figure 3). Then take the existing bottom air bag bolts, add a small amount of thread lock and thread them finger tight to hold the air bag in place.
Secure the valve
Guide the premium air line through the main frame of the hitch and secure it using the provided hardware with a ratchet wrench with 1/2” socket. Note that you may need additional washers that are included with the premium air line kit(s).
Reattach the paddle
Take the existing top air bag bolts and thread them by hand to attach the paddle to the air bag bolt, if applicable, place the paddle spacer block on top before threading. Finish by tightening the top air bag bolts with a 7/32” Allen wrench and the bottom air bag bolts with a 9/16” socket, and replace the air valve cap.
Check for leaks
IMPORTANT: If your air bag is not holding air correctly, repeat the same steps above. If there is continuously leaking, it is recommended to do a “dunk test” in a bucket of water. To do this test, air up the air bag to 45-50 PSI and gently lay it in the bucket of water to find the location of leaking. You can also spray soapy water to find it as well.
Choose your system · 2 of 2
2022 & older: plastic air line
Remove the frame support and air bag
Start by removing the bottom frame support with a 9/16” wrench and an impact wrench with a 9/16“ socket, set aside for re-installation later.•Remove the top air bag bolts located on the top side of the paddle with a 7/32” Allen wrench, if applicable, also remove the paddle spacer block. Continue by removing the bottom air bag bolts using an impact wrench with a 9/16“ socket, set all hardware aside for later installation.
Remove the old plastic line
Snip the old air line and remove the air bag from the hitch frame. With the crimp style air fittings, it is recommended to get new air line(s) and/or fittings from Shocker Hitch directly. NOTE: These are not typical crimp fittings, they are special brass elbows with an “internal” steel sleeve in the fitting to support the plastic tube (see Figure 4).
Remove the valve and fittings
Using a ratchet wrench with a 7/16” socket, loosen the air valve and remove it from the air bag assembly from the main hitch frame. Then using a 1/2” wrench for 12K models or 15mm for the 20K models, loosen and remove the old inner air fittings from the hitch frame. Repeat this process for the air bag fitting as well.
Install the air bag fitting
Add a generous amount of non-hardening sealant to the threads of the new air fitting and finger tighten onto the new/existing air bag. Finish tightening with a 1/2” wrench for 12K models wrench or 15mm for 20K models and having the air fitting facing 90° “downward” (see Figure 5).
Install the valve and inner fitting
Add a generous amount of non-hardening sealant to the threads of the main hitch frame and air valve, finger tighten, then tighten with a ratchet wrench with 7/16“ socket. Then add a generous amount of non-hardening sealant to the threads of the new inside air fitting, finger tighten, then finish tightening with a 1/2” wrench or 15mm for 20K models and having the air fitting facing toward the rear of the hitch (see Figure 6).
Connect the plastic line
Take new plastic line and insert it into the brass fitting of the air bag, tighten the brass fitting coupler finger tight, then tighten 2-3 turns with a 9/16” wrench. Then take the assembled air bag and guide it through the slotted hole on the main hitch frame with the air line facing toward the front of the hitch. Insert the new plastic air line into the inside brass fitting, tighten the brass fitting coupler finger tight, then tighten 2-3 turns with a 9/16” wrench.
Reassemble the hitch
Take the existing bottom air bag bolts, add a small amount of thread lock and thread them finger tight to hold the air bag in place. Then take the existing top air bag bolts and thread them by hand to attach the paddle to the air bag bolt, if applicable, place the paddle spacer block on top before threading. Finish by tightening the top air bag bolts with a 7/32” Allen wrench and the bottom air bag bolts with a 9/16” socket, reinstall the frame support bracket, and replace the air valve cap.
Check for leaks
IMPORTANT: If your air bag is not holding air correctly, repeat the same steps above. If there is continuously leaking, it is recommended to do a “dunk test” in a bucket of water. To do this test, air up the air bag to 45-50 PSI and gently lay it in the bucket of water to find the location of leaking. You can also spray soapy water to find it as well.
After the repair: check your setup
- Reinstall and secure the hitch. Fully insert the receiver shank, align the holes and secure the 5/8-inch hitch pin and cotter clip. Check that the ball-mount pins and clips are seated and locked.
- Lubricate the pivot. Grease the main pivot bolt through its grease fitting. Grease the hitch ball as recommended in the installation guide.
- For air hitches, reset pressure under load. Hook up and load the trailer as you normally would for travel. Add air until the main frame lightly compresses the truck-side bump cushion. Follow the spacer and paddle guidance for your model in the installation guide.
- Never exceed 100 PSI in the air bag. This is the maximum, not a recommended towing pressure. The correct setting depends on the loaded trailer.
- Do not tighten the top jamnut as a routine adjustment. After the replacement assembly is correctly set, extra tightening can restrict the hitch pivot and create a stiff ride.
- Before towing: check the trailer is level, the coupler is secured, and the safety chains and electrical cord are connected. Stay within the lowest-rated component’s capacity.
For the repair guide’s leak test, use 45–50 PSI and check for bubbles with soapy water or its bucket-of-water method. Release pressure before correcting a leaking connection, then repeat the test. Reset towing pressure with the trailer loaded afterward.
Watch the air bag and air line replacement
Need help with your air bag or air line?
Have your hitch model and a photo of the assembly ready. Our team can help identify the right replacement parts and instructions.