

Never leave the Driveway without checking these off.
- Check Your Tire Pressures
- Check All Pins and Clips
- Check Trailer to Truck Connection
- Secure Your Chains Properly
- Check Your Trailer Lights
1. Tire Pressure Check
Tires are the only thing between you and the pavement, and towing puts massive stress on them.
- The Tow Vehicle: Check your door jamb sticker. When towing, you often need to inflate the rear tires to their “Max Load” PSI (which is usually higher than your daily driving pressure).
- The Trailer: Most trailer tires (Special Trailer or “ST” tires) are designed to be run at their maximum cold pressure listed on the sidewall to reduce heat buildup.
- The Spare: Trailer tires are notorious for blowouts due to dry rot or sitting. A flat spare is just a heavy ornament; check it every single trip.
2. Pin and Clip (The “Double-Check”)
Hitch Pins: For bumper pull trailer towing ensure the pin goes all the way through the receiver on the tow vehicle and the cotter pin (bridge clip) is snapped securely on the other side. Make sure all the ball mount attachments pins and clips are secured on the tow hitch. For gooseneck or 5th wheel towing, make sure all safety pins are attached and secured.
3. Coupler Check
- The Coupler: For bumper pull and gooseneck trailer towing, once the trailer is on the ball, close any latches, clips or pins. Couplers vary, check with manufacture for proper use. Also make sure the coupler is made for the hitch ball size you are using. 2″ coupler needs 2″ hitch ball. 2-5/16″ coupler needs 2-5/16″ hitch ball. 3″ coupler needs 3″ hitch ball.
- For Kingpin, check the kingpin is properly seated into the 5th wheel plate and locked into place. Securing varies by brand so check with manufacture for proper use.
- The “Tug Test”: After pinning everything, jack the trailer up slightly. If the rear of the truck rises with it, you know the ball is properly seated in the coupler.
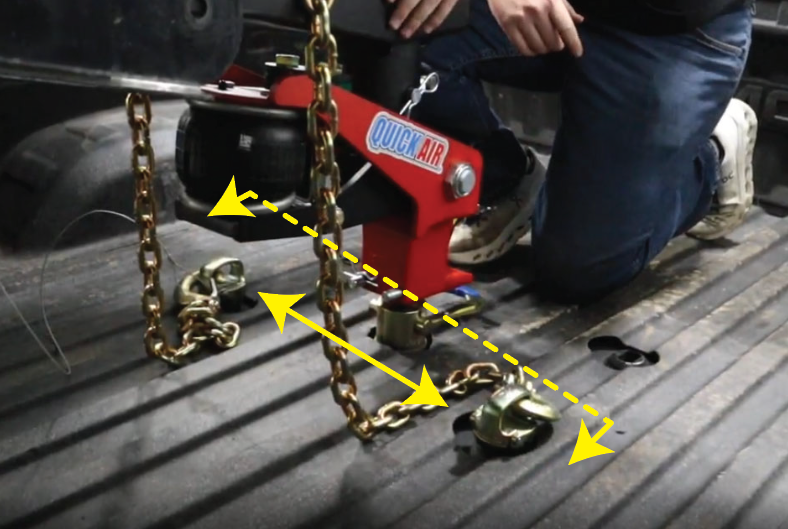
4. Secure Your Safety Chains
This isn’t just a suggestion; in most jurisdictions, it’s the law.
- For Receiver Hitch, Bumper Pull Towing: Use the “Cradle” effect by crossing the chains (left to right, right to left), you create a steel hammock. If the coupler jumps off the ball, the trailer tongue drops onto the chains rather than digging into the asphalt—which would likely cause an accident. Crossing the chains also allows you to take up excess slack, preventing them from dragging and sparking, while still giving you enough lead to make tight turns. However consult your state & location dot laws.
- For Gooseneck Towing: The best safety chain hook-up location is slightly rearward of the ball centerline and 6″ to 12″ left or right of the ball laterally. Safety chain hook-up should Not be directly in-line with the ball and NEVER attached forward of the gooseneck ball.
- For 5th Wheel Towing: If you are using a 5th wheel hitch with a kingpin, chains are not generally required. However consult your state & location dot laws.
- Chain Rating: Make sure the chains are rated for the gross trailer weight of the trailer you are towing.

5. Light It Up
Modern wiring can be finicky. Corrosion in the 7-way plug is the most common cause of “ghost” light issues.
The Sequence: Don’t just look for “blinkers.” Check:
- Running Lights: Make sure the trailer is visible at night.
- Left/Right Turn: Confirms the signal circuit is grounded.
- Brake Lights: Have a partner stand back there, or use a mirror (or the reflection of a storefront window) to verify they brighten when you hit the pedal.
- Pro Tip: If the lights flicker or don’t work, clean the copper contacts on your plug with a bit of contact cleaner or a small wire brush.
Safety Note: If you are using a Weight Distribution Hitch (WDH), remember that your setup sequence changes slightly, as you’ll need to engage your spring bars after the initial ball-drop to distribute that weight to the front axle of your truck.
Note: Towing capacity is limited by the lowest rated component. Also refer to location and state dot regulations and laws regarding trailer towing, chain placement and so farther. Laws vary by state.
FAQ
- How Much Drop Do I Need?
- Do I Need Sway Control?
- My Truck Squats with Trailer
- How To Level Trailer
- Advantages of Air Hitches
- Trailer Chucking
- What is Towing Capacity?
- Do I Have a Gooseneck or 5th Wheel?
- Do I Need an Offset Gooseneck Coupler?
- Shocker Gooseneck Hitch Uses
- Types of Trailers for Towing with a Pickup Truck
- Types of Gooseneck Balls
- Why Grease Your Hitch Ball?
- How to Back Up a Gooseneck Trailer?
- How To Level Trailer