
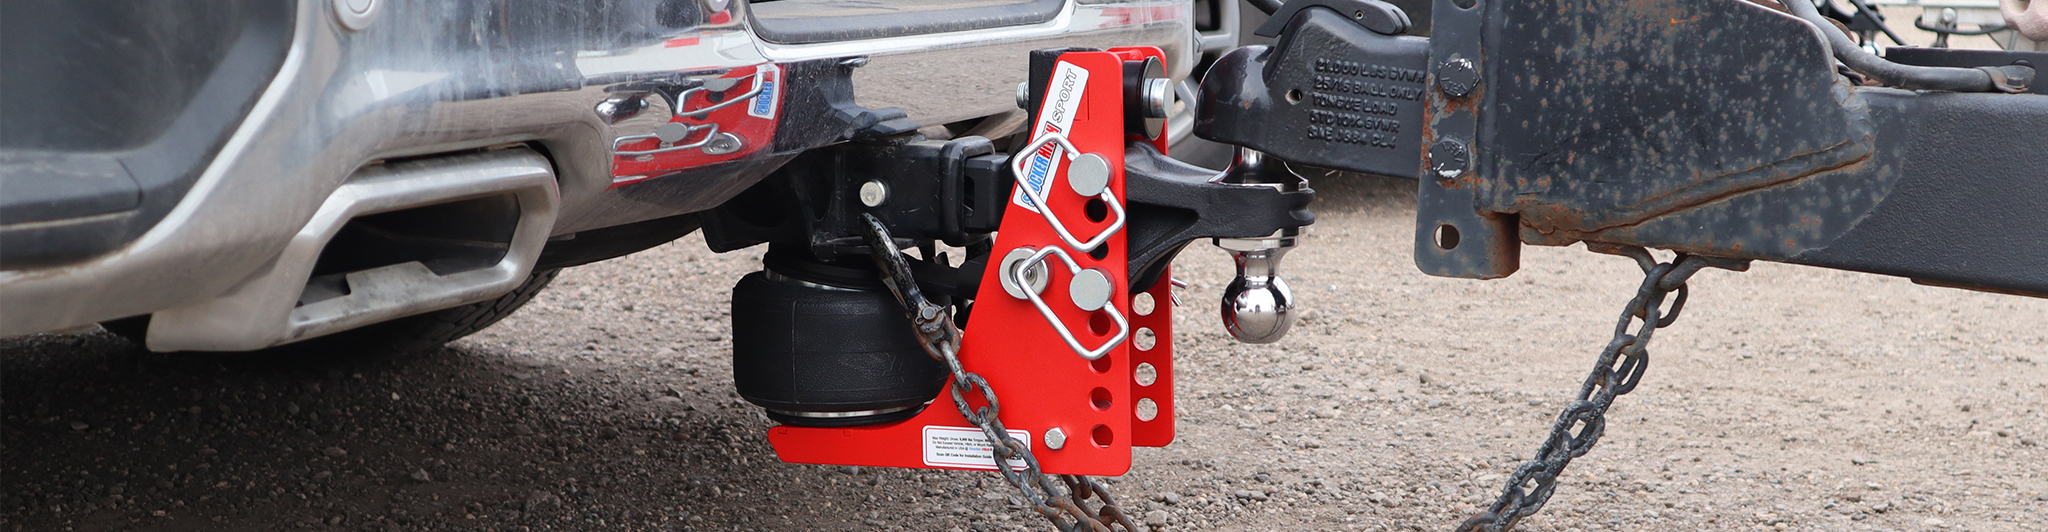
Air pressure changes can occur for an air spring bag (airbag), which is a normal, dynamic part of an air hitch and air bag suspension, primarily caused by stretching when new, changes in trailer load weight and placement, ambient temperature changes, or system leaks.
What causes you to believe that the air in the air hitch is not holding air? Are you seeing a slight air pressure drop? Is it losing a large amount of air? Is the air spring completely losing air and totally going flat?
There can be many variables for slight pressure drops, which may seem like an air leak, but it’s really a result of air spring stretching with new or drastic temperature changes.
Common Reasons for Slight Air Pressure Changes
- New Air Spring Bags Stretch for First Couple of Uses: For the first several uses, you can expect an approximate 5 psi change, as the rubber and cord relax and stretch, they can maintain more volume. This ends up causing you to lose that 5 psi after the first few uses. After that, the bag will become very stable.
- Temperature Changes Affect Air Pressure: As the temperature drops, you can expect a 1-2 psi change per 10° F drop or rise in temperature. Did you have a significant temperature change overnight?
- Adding Weight To Trailer Affects Air Pressure: It can seem like the air spring bag is losing air pressure when you add weight to your trailer or truck bed, which changes the tongue weight. If you add weight to your trailer, which adds more tongue weight, it can appear like the air spring is losing air pressure, but really, you just need to increase air pressure after you add additional weight.
Can nitrogen help reduce pressure changes?
Dry nitrogen may reduce moisture-related pressure variation compared with ordinary compressed air giving you a more consistent performance and reduces the need to add or reduce pressure with temperature changes. If you want to have less pressure changes because of temperature changes, use nitrogen instead of air for the air spring bag pressure.
Air Receiver Hitch Troubleshooting
Setup
With an Air Receiver Hitch such as the SH-200-200 or SH-HD200-250, hook up the trailer, load it evenly, stay within the maximum tongue weight, and then inflate the air spring bag until the tow vehicle-side bump cushion is slightly compressed. If the trailer load changes later, air pressure may need to be adjusted again because added or shifted weight changes the tongue load and system pressure.
Warning: Never inflate an air spring that is not installed in a hitch frame.
Problem: Air pressure seems low, but there is no apparent leak
Solution:
This is often not a leak, but a load-related pressure change
- Added weight to the trailer increases the required air pressure.
- Load shifting forward increases tongue weight and pressure demand.
- Removing rear weight from behind the trailer axles can also increase tongue load.
Action:
- Re-adjust air pressure after any load change.
- Even a few hundred pounds can noticeably affect pressure.
Problem: Suspected air leak
Solution: Perform a structured leak check.
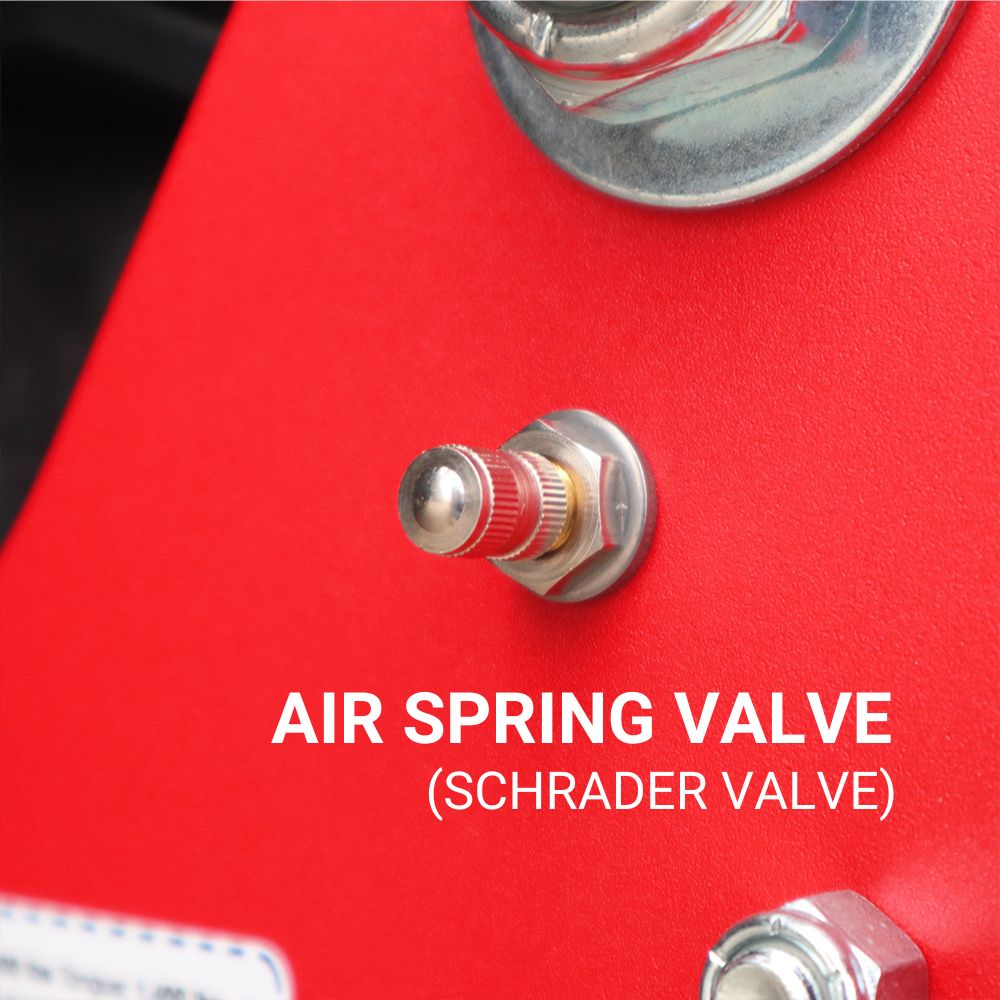
- Check the valve stem core and make sure it is tight and clean. This is a common leak point.
- Inflate the air spring to 50 PSI.
- Spray soapy water on:
- Air tank valve connection.
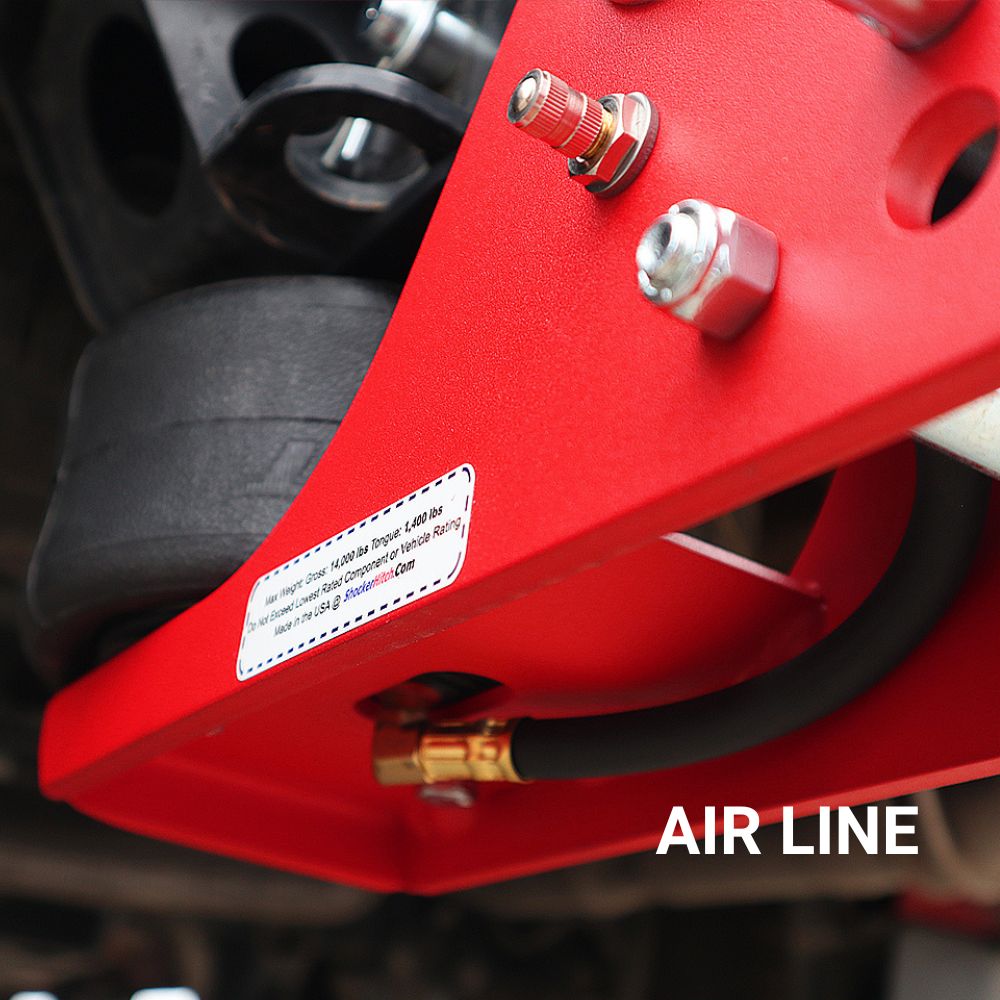
- Airline path to frame (if applicable).
- Valve stem.
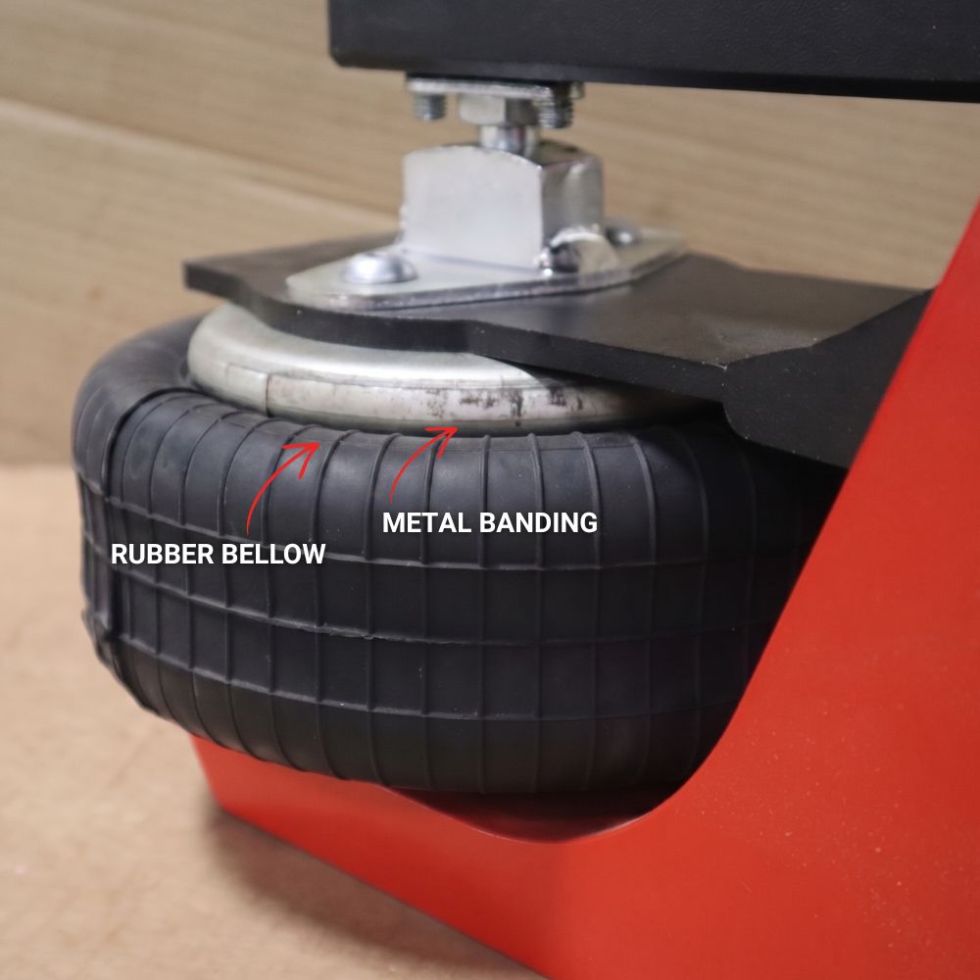
- Rubber bellow, especially around metal banding or crimping.
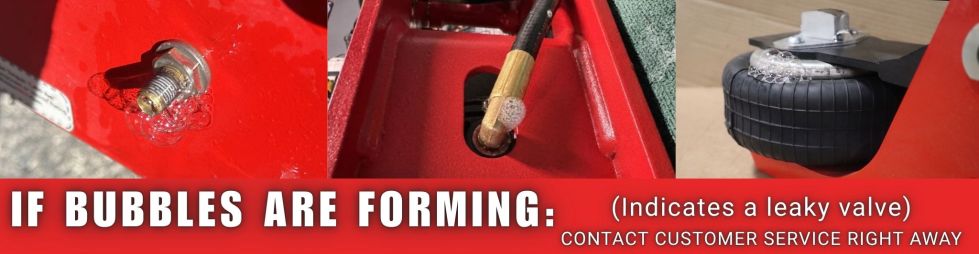
- Look for bubbles to identify the leak location.
Problem: Leak at the air tank valve or fitting
Solution:
If bubbles appear at the fitting:
- Step A: Tighten the air tank valve approximately 1/4 turn.
- Step B: If that does not stop the leak, remove the valve, mark its orientation, and remove old sealant.
- Apply thread sealant (Loctite 545 recommended) to both male and female threads.
- Hand tighten, then torque based on size:
- 1/8" NPT: 2 full wrench rotations, leave 2-3 threads visible
- 1/4" NPT: 2.5 full wrench rotations, leave 1-3 threads visible
- Warning: Do not bottom out the fitting.
- Step C: Replace the valve if resealing does not resolve the leak.
Problem: Leak from air spring (bellow or band)
Solution:
If bubbles appear on the rubber bellow or near the metal banding:
- Replace the air spring immediately.
- If a temporary repair is needed, remove the air spring and add ~4 oz of a fix-a-flat type sealant.
- Roll the air spring to distribute sealant internally, then reinstall and retest.
Problem: The leak cannot be located
Solution:
- Inflate the air spring to ~50 PSI.
- Submerge the entire hitch in water.
- Watch for bubbles.
Interpretation:
- Fitting leak → reseal per the steps above.
- Leak at band/bellow → replace the air spring.
Other Air Receiver Products
With other Air Receiver Hitch products like the SH-TF200-200 and SH-S200-200, the procedure is the same, except these models use a Schrader valve instead of an airline built into the frame. Follow the same loading and leak-testing steps, but check only the air tank valve connection, rubber bellow, and metal banding. The main difference is whether the air tank valve needs to be resealed.
If the air tank valve leaks, remove it, clean off the old sealant, apply Loctite 545 to both male and female threads, and reinstall using the same thread-engagement guidance listed above.
Tongue Mount Hitches
With tongue mount hitches such as the SH-4500, use the same loading and leak-check process, but inflate until the split lock washer on the truck side is compressed flat. If the hitch still loses air, check the valve stem core, perform the soap-and-water test, and follow the same fitting, band, and submersion procedures.
Air Equalizer Troubleshooting
Air Equalizer setup before troubleshooting: Load the tow vehicle and trailer as they will be towed. Couple and secure the trailer, then install and set the weight-distribution bars using the instructions for the exact system. Retract the jack to transfer the load. Add air until the main frame just touches the bump cushions closest to the trailer without compressing them, and the forward washers closest to the truck are free. Use these physical checks to set the air pressure; 40-60 PSI is an average reference, not a required target. Never exceed 100 PSI. If this endpoint cannot be reached within the limit, stop and contact Shocker Hitch to check the weight-distribution setup, hitch height and actual tongue weight. Do not tighten the factory-set travel-limiter bolts. Never remove the air spring from the Air Equalizer frame when filling it with air. If pressure is still dropping, follow the leak checks below.
Problem: That air spring bag will not fill with air, but there is no apparent leak.
Solution: This is a common misinterpretation. You most likely are filling it with air, but there is too much tension on your weight distribution bars, putting too much leverage on the air spring. Adjust your tension and retry. If you’re still running into problems, call our customer service team. It may be possible you’re overweight or tongue heavy.
Problem: There is an air pressure leak and I am not sure where it is leaking.
Solution: Take these steps to find the leak.
1. Check your valve stem core and ensure it is tight. This is a common leak point. Tighten the core until it is firm.
2. Perform a soap and water test. Air the air spring up to 50 psi, then spray it with a soap and water solution. Spray the solution starting from the air tank valve where it enters the bag, continuing through to the air hitch frame, and include the valve stem. Also spray the rubber / neoprene bellow of the air spring, especially around the metal banding, to identify the leak’s location. Bubbles will indicate the leak location.
Solution: If valve stem has leak.
1. If you see bubbles coming from the top of the valve stem, tighten the valve stem core. If you see bubbles from the fitting connected to the air spring, you have several options to attempt to seal it..
2. If you see bubbles coming from the fitting connected to the air spring, you have several options to attempt sealing.
A. Tighten the air tank valve approximately 1/4 turn. If that doesn’t fix it. Go to B.
B. Remove the air tank valve from the air spring and remove the old sealant. After removing old sealant, use a sealant like Loctite 545 and put it on both the male threads (fitting) and female threads (air spring). Hand-tighten the air tank valve until it is hand-tight. For 1/8” NPT Air Tank Valves, go 2 full rotations with a wrench, 2-3 threads should be visible after assembly. Warning: Don’t bottom out the air tank valve to the air spring. For 1/4" NPT Air Tank Valves, go 2.5 full rotations with a wrench, 1-3 threads should be visible after assembly. *** Warning: Don’t bottom out the air tank valve to the air spring. If that doesn’t fit it. Go to C.
C. Replace the air tank valve
Solution: If air spring bag or band has a leak.
1. If you see bubbles coming from the rubber/neoprene air spring bag or from around the metal banding, contact us for a replacement.
2. If you need an immediate repair, you can remove the air spring and use a fix-a-flat (approximately 4oz) type sealant for a temporary repair until you receive your new air spring. After filling, roll the air spring back and forth to evenly coat the inside, reinstall the air spring, then repeat the previous steps to test for leaks.
Solution: I have tried the soap and water test and still cannot find the leak.
If you can’t visibly see a leak, the next step is to submerge the air hitch in water. Ensure you have approximately 50 psi in the air spring prior. When submerged, if there is a leak, you should see bubbles begin to come from the leak point. If it’s coming from the fittings, go through and follow the process above on resealing and assembling the airline to the air spring. If it’s coming from the bellow and the metal band, call us immediately for replacement.
Gooseneck Air Hitch and Quick Air 5th Wheel to Gooseneck Troubleshooting
Setup
With our Gooseneck Surge Air Hitch or Quick-Air product lines, such as SH-RND-SL, 4RND-STR-SL-CA/SH-RVGC-4405, and SH-800-KP, follow a similar loading process. Load the trailer onto the gooseneck ball, secure it with the Shift Lock handle in the locked position or the Demco EZ-Latch flipped down and locked, and connect the safety chains. Load the trailer appropriately, then fill the air spring to about 15 to 20 PSI. You should see the green bump cushions slightly compress. Adjust ride quality by adding or removing 5 psi at a time as needed
Warning: Never remove the air spring from the frame and fill it with air.
Problem: Air pressure seems low, but there is no apparent leak
Solution:
This is often not a leak, but a load or setup issue
- Confirm the trailer is loaded appropriately.
- Make sure the hitch latch is fully locked and the safety chains are connected.
- Adjust the pressure in 5 PSI increments until the ride feels right.
Problem: Suspected air leak
Solution: Perform a structured leak check.
- Check the valve stem core and make sure it is tight. This is a common leak point.
- Inflate the air spring to 50 PSI.
- Spray soapy water on:
- Air tank valve connection.
- Valve stem.
- Rubber bellow, especially around the metal banding.
- Look for bubbles to identify the leak location.
Problem: Leak at the fitting connected to the air spring
Solution:
If bubbles appear at the fitting:
- Tighten the air tank valve about 1/4 turn.
- If that does not stop the leak, remove the valve and remove the old sealant.
- Apply a sealant like Loctite 545 to both the male and female threads.
- Hand-tighten the valve.
- For 1/8" NPT valves, tighten 2 full rotations with a wrench and leave 2-3 threads visible.
- For 1/4" NPT valves, tighten 2.5 full rotations with a wrench and leave 1-3 threads visible.
- Warning: Do not bottom out the valve into the air spring.
Problem: Valve stem leak
Solution:
- Replace the valve stem core
Problem: Leak at the rubber bellow or metal banding
Solution:
- Replace the air spring immediately.
- If a temporary repair is needed, remove the air spring and use ~4 oz of fix-a-flat type sealant.
- Roll the air spring back and forth to coat the inside, reinstall the air spring, then retest for leaks.
Interpretation:
- Fitting leak → reseal per the steps above.
- Leak at band/bellow → replace the air spring.
If the solution above is not listed, please contact us. We want you to have the best towing experience possible. If you need assistance, please contact us.
Shocker Hitch Towing Tips & Tutorials
- Air Pressure Guide for Shocker Hitches: Quick Tip: Everything you need to know about the air pressure setting for your specific air hitch.
- Towing Tip: Grease Your Hitch Ball: Quick Tip: Apply a small pad of grease around the ball and on the underside toward the front. This stops the coupler from squeaking, reduces wear, and prevents the trailer from sticking and lifting the back of your truck when you try to unhook it.
- How Much of a Drop Hitch or Rise Do I Need? :Quick Tip: Measure from the ground to the coupler on a level trailer, factor in the shank of the ball, and account for the truck’s rear dropping a couple of inches once the tongue weight is applied.
- Adjusting Air Pressure (Gooseneck Surge): Quick Tip: Setting the air pressure is like tuning a radio dial. Usually, starting around 15 to 20 lbs of air is a solid baseline for lighter trailers, and you can dial it up for heavier loads until you find the sweet spot for a smooth ride.
- How to Install Your Shocker Air Receiver Hitch: Quick Tip: Take the air out of the bag and push it down before installing. This increases the gap, allowing the hitch to slide right in so you can easily line up your pin. After you hook up your trailer, air it up until the tow vehicle side top bump cushion is slightly compressed.